
9 ways to create artistic seascape photography
There’s something mesmerising about the sea! From a distance, listening to the rhythmic sound of waves breaking on shore is both soothing and calming. Standing up right close with a camera near waves breaking over rocks around you is quite another story however, and it can really get the heart rate going! Coastal and beach scenes offer so many options to create a variety of stunning and very different results, whether its the use of Neutral Density Filters or polariser, deliberately choosing different shutters speeds, shooting from a high or low position, choosing to focus on intimate details or post-processing in multiple ways, the choice is endless.
Check out 9 ways to create seascape images that WOW!
1. Very Long Exposures for Smooth Water
Seascape photography using a slower shutter speed allows us to create both mood and atmosphere. When you choose a REALLY long exposure the waves become a completely silken mist, and if you can capture cloud movement happening at the same time, it can add either a sense of motion into the scene or enhance the feeling of calm.

Mt Maunganui Exclamation of Sunset, 65 seconds f/8 ISO 100

Cathedral Cove at Blue Hour, 2 min f/8 ISO 100
In order to shoot very long exposures of say 30 seconds or longer, you’ll either have to shoot when the light is very low OR add a Neutral Density Filter (like a ND64 6-stop or ND1000 10-stop) to reduce the light being gathered by your camera’s sensor, allowing you to extend your shutter speed. I take my ND filters with me everywhere I go, because I anticipate using them in every seascape shoot for more artistic options and results.
My filters of choice are the Kase Filters Armour Kit and Revolution Professional ND Kit from Kase Filters NZ - I’m always happy to chat about what filters will work best for you and your photography gear and goals so drop me a line!

New Brighton Pier Golden Hour, 30 sec f/16 ISO 100
In the example above, the longer exposure smooths out the waves breaking under the pier, but also captures the interesting cloud movement that appears to be coming directly towards the viewer. In the example below, the water breaking around the rocks becomes like a silken mist with a longer exposure treatment, which is in contrast to the shutter speed used in the images in the next point.

Sea & Rocks at Mt Maunganui, 25 seconds f/13 ISO 100
2. Shorter Long Exposures showing Movement
As ethereal and calming as long exposures are, sometimes it’s more beneficial to show how the water is actually moving in the scene, capturing the flow of water in and around rocks. You can use different shutter speeds for different effects, as well as playing with the timing. I often think that the backwards flow of waves as they flow back out to sea makes a cleaner looking result. To guarantee not to miss these moments, I usually set my Drive Mode to Low Burst Continuous Mode so I can get several images as a wave rolls in and back out and then choose my favourites from the set to use.

Gairloch Shipwreck Taranaki, 1 sec f/16 ISO 80

St Clair Beach Dunedin at Dusk, 1.3 sec f/16 ISO 100

Diamond Beach waves, Iceland, 1 sec f/14 ISO 80
3. Freeze Framing Powerful Wave Action
At the complete opposite end of the spectrum, you can also capture the raw, incredible power of the ocean with crashing waves using a fast shutter speed. One way to showcase this is capturing the moment the waves meet a stationery object such as a rock on the shore. It’s likely that you’ll need to use a long focal length to successfully separate and highlight individual wave action, all these images were taken at 100mm or longer.
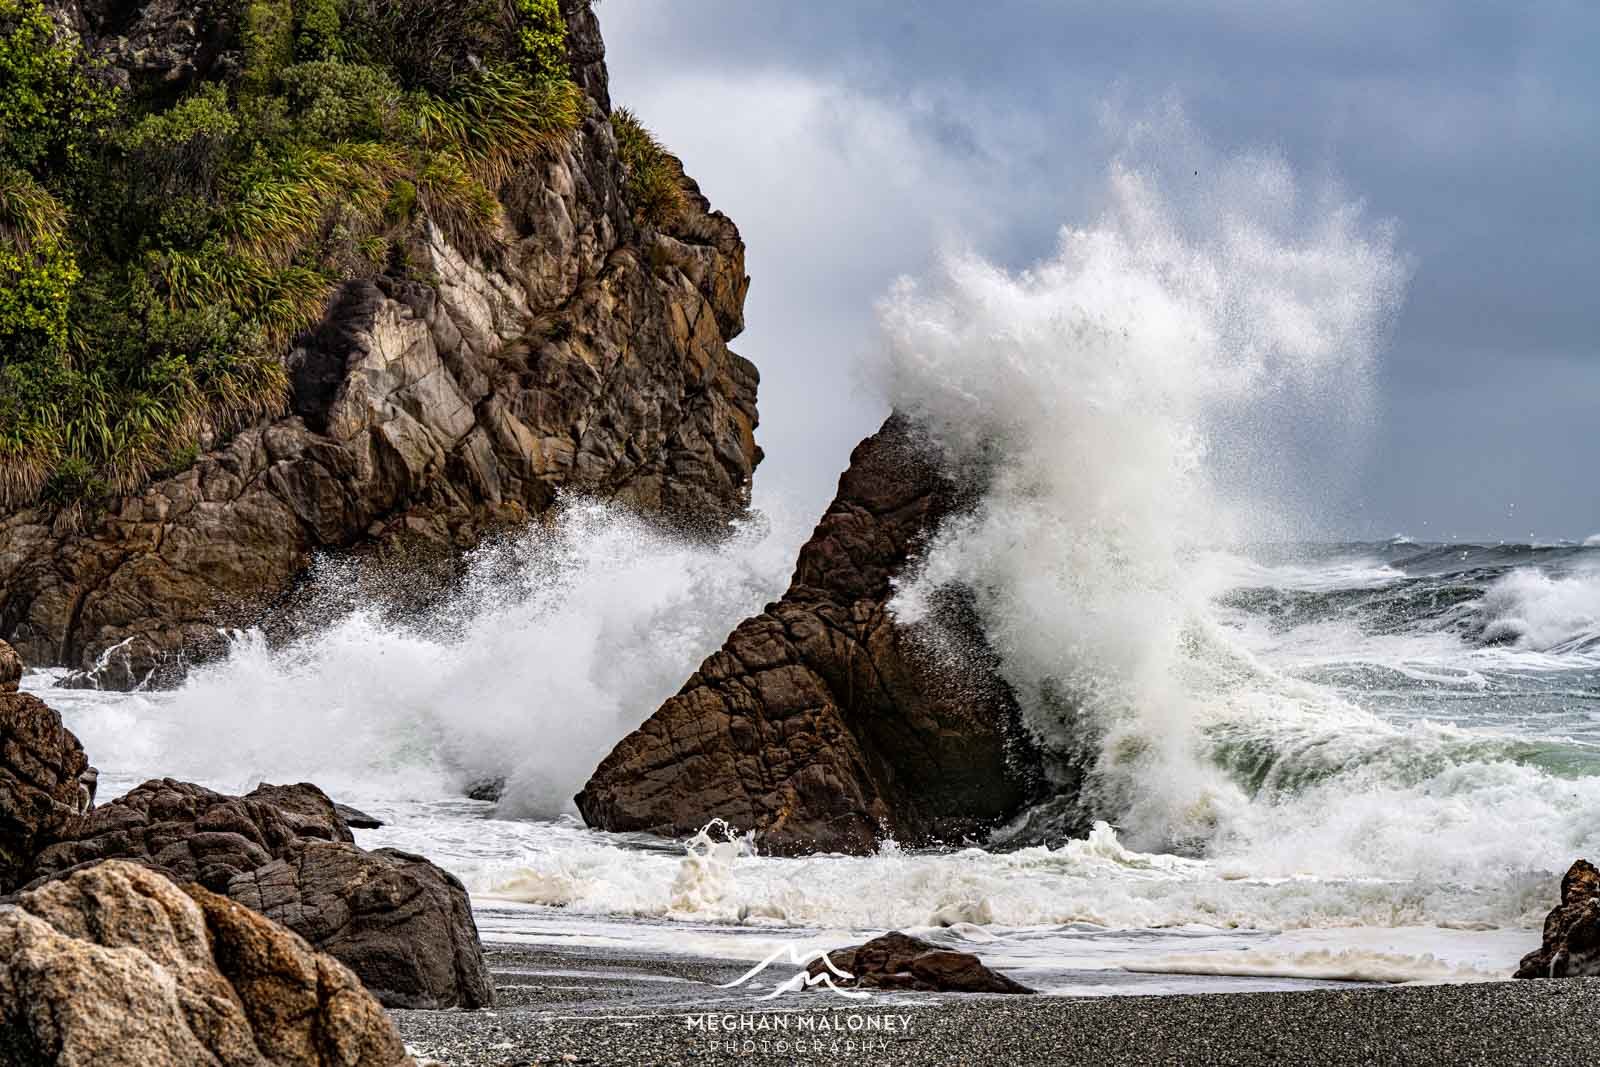
Waves on NZ’s West Coast, 1/200 sec f/11 ISO 125
You might also have heard the term ‘white horses’ which refers to the frothy, white crests of waves rolling in that seem to emulate a horse’s head, and depending on the strength and direction of the wind you may be able to capture these in frame with a fast shutter speed.

Shipwrecked Shag, Taranaki 1/125 sec, f/6.3 ISO 100
You might also have heard the term ‘white horses’ which refers to the frothy, white crests of waves rolling in that seem to emulate a horse’s head, and depending on the strength and direction of the wind you can capture the exact moment the waves crest with a fast shutter speed.
When the sun is at the right angle, you can also capture interesting light hitting the tops of the waves as well.

Golden hour waves, Iceland 1/640 sec f/11 ISO 200
4. Shooting from an elevated vantage point
Shooting from an elevated position better shows off patterns in tide lines as well as the scale of a coastline. If you can find a position to shoot from a cliff or a path high above the coastline, you can appreciate the vastness of the area with the shape of the land disappearing off into the distance.

Waves on black sand, Iceland 1/800 sec f/8 ISO 200

Coromandel coastline sunset views, 3 sec f/11 ISO 50
If you have a drone, you can get even more height to further enhance the view (just make sure you comply with all the Drone Regulations for where you are allowed to fly and how high you can go), or perhaps try a top-down approach for a more abstract feel which also showcases the shoreline curves and reveals patterns not visible from the ground.

Opito Bay Coastline, Coromandel 1/120 sec f/2.8 ISO 100

Matai Bay, Northland 1/30 sec f/2.8 ISO 200
5. Low Angle Perspectives
At the opposite end of the scale, choosing a low angle perspective will add depth and allow your foreground elements to pop. Think about getting down close to the sand or rocks with a wide angle lens. This way, you can accentuate leading lines with rocks or streams leading out to sea, or alternatively you can use driftwood, tussock or patterns in the wet sand to create more foreground interest. You will need to be more mindful of waves coming in if your camera is set up low to the ground though!

Mt Maunganui Sunset Rocks, 8 sec f/8 ISO 50

Moeraki Boulders Dawn 2.5 sec f/8 ISO 100

Cathedral Cove Sand Patterns 30 sec f/11 ISO 100
6. Capture Wet Sand Reflections
This requires some careful timing, but if you time it well in the right locations you can achieve stunning reflection results, especially when there are clouds in the sky or offshore rocks that will provide a solid structure to accentuate the reflection object. I usually try to time my visits when the tide is outgoing towards a lower tide as there will be more and more sand visible as the waves retreat.
In NZ, you can use websites like Tides4Fishing or NIWA Tides to help plan your visit around the best tide times, also bearing in mind that some locations may only be accessible at low tide (there are several of NZ’s most epic beaches in this category: Tongaporutu (Three Sisters) in Taranaki, the beach that you access through Tunnel Beach in Dunedin, the bay through the cave at Cathedral Cove, Coromandel, Cathedral Caves in the Catlins, Motukiekie Beach on the West Coast, Wharariki Beach in Nelson Tasman.

Wharariki Beach Sunrise Clouds, 1/13 sec f/10 ISO 100

Tongaporutu Rock Reflections, Taranaki 1/60 sec f/8 ISO 100
And, while a perfect reflection is always nice to capture, sometimes working with less than perfect reflections where sections of sand are starting to dry off or where wave wash has lingered on the shore can lend a more natural looking result to the final image.

Piha Beach Dawn, Auckland 13 sec, f/8 ISO 100
7. Capture what lies beneath in Tidal Pools
Using a wide angle lens as well as a polariser and getting down low to the rock pools can reveal interesting subjects such as starfish or other living organisms in the rocks below - you can see the comparison below the difference between using a polariser vs leaving the reflection as is. Can you spot the starfish under the water on the one to the right?

Otarawairere Bay (no polariser)

Otarawairere Bay (polariser)
The beauty of using a polariser is that you will achieve a ‘see-through’ effect in the very front of your scene but further back you can still see reflections like in the example below where the mountains are reflected further back in the scene.

Maungamanu Bay Kaikoura Mountain Reflections, 15 sec f/6.3 ISO 100
If you have an underwater housing for your camera (or a GoPro) you could also capture a ½ and ½ shot showing both what is above and below
8. Look for Abstract Opportunities
Seascapes also suit ICM (Intentional Camera Movement) particularly when there is really good definition with a lot of different colour tones represented in the sky which you can then see repeated in the sand. For the cleanest lines, put your camera on your tripod, use a long focal length around 70mm and use your horizontal pan function with a speed of around ⅕ of a second. For more in-depth tips, check out my Beginners Guide to ICM.

Raglan Beach ICM 1/5 sec f/16 ISO 100 (70mm)

Brighton Beach Dunedin ICM, 1/5 sec f/8 ISO 100 (35mm)
You could also choose to use a long telephoto or macro lens to focus on the more intimate details of a scene such as sand patterns, ripples, or waves.

Golden light from ship’s wake in Antarctica, 1/5 sec f/11 ISO 50

Messy water from onboard ship in Antarctica, 1/640 sec f/7.1 ISO 250

Ripples in the sea, 1/1600 sec f/8 ISO 320
9. Try artistic edits using Black & White and High Key
Long exposure seascapes often naturally suit a monochrome or high key treatment when it comes to post-processing. The contrast between a strong subject and the smoother sea can emphasize shape, texture, and contrast without the distraction of too many colour tones in the image.

Eystrahorn Beach, Iceland 1.3 sec f/13 ISO 50

Mataikona Beach Monochrome, Wairarapa 30 sec f/14 ISO 100

Motukiekie Beach Black & White, 20 sec f/11 ISO 100
I don’t always go out and shoot with a monochrome or high key result in mind, and often it’s not until I come to editing my images that I’ll try more than one type of edit with an image. Using virtual copies in Lightroom is a great way to edit an image multiple ways to compare which one you prefer most.

Moeraki Boulders Sunrise Colour 90 sec f/14 ISO 50

Moeraki Boulders Black & White

Twelve Apostles Sunrise Colour 30 sec f/11 ISO 100

Twelve Apostles Sunrise High Key
Lastly, how about some handy tips you can use out in the field shooting Seascapes?
It’s one thing to admire seascape images online, but quite another to successfully execute a similar result yourself in the field. To help improve your chances of success, I’ve put together a downloadable that you can save to your phone and use as a checklist when you are next out shooting seascapes.
Click on the link to access the Shooting Seascapes Downloadable Checklist.
If you enjoyed this post and would love to learn more, I’d love to host you in the field at an upcoming workshop, check out my current range of Landscape Photography Workshops and Online Courses.