
Mastering Light: 7 Essential Tips for Landscape Photography
Light is the secret ingredient that can make a landscape magical. No matter how stunning a view normally is, without the right light and weather conditions, you might easily drive right past a scene without taking a second look. But conversely, even an ordinary everyday scene can be transformed into something of beauty when it is given the magic of light.
While knowing your gear intimately and understanding what makes a good composition is important, understanding how to use light in your photography is what really elevates your results. In this post, we’ll explore the 7 best ways you can use light in your landscape photography to ensure incredible results.
1.Golden Hour Glow
Most landscape photographers would agree that golden hour light is one of their favourite ways to light a scene. It’s that time of day just after sunrise and just before sunset when the sun sits low on the horizon, creating soft, warm light that paints the entire landscape in a golden glow. This adds both richness and depth to an image, as well as softening harsh contrasts that exist when the sun is higher in the sky.

Tarawera Golden Hour Sunrise 1/100 sec | f/11 | ISO 100
The low angle of the light during golden hour also creates long, gentle shadows that add an interesting contrast between the highlights and shadows of a scene. When you can incorporate them as leading lines into the corner of your frame, even better!

Wharariki Beach Golden Evening 1/320 sec | f/11 | ISO 100
How long does golden hour last? This depends on both the season and the latitude of your location. The closer you are to the Equator, the shorter the timeframe, the closer you are to the poles the longer it will be. Seasons also affect this, in winter when the light stays lower in the sky, golden hour can last much longer, sometimes for hours in locations such as Iceland which sit far to the north. But as a general rule of thumb, anticipate golden hour to last an average of around 30-45 minutes, which gives you plenty of time to shoot a number of different compositions and adjust your settings as the light changes.

Nugget Point in Golden Hour 1/25 sec | f/10 | ISO 100
Tips for shooting Golden Hour:
Arrive early (for sunset), it’s very easy to miss this window of opportunity if you are not in place at least an hour before sunset or staying at least half an hour after sunrise.
Use shadows creatively in your composition - think about leading lines, or repeating patterns.
Use the natural warmth that appears in the landscape - clouds will begin to have colour in them at this time of day rather than just appearing white or grey which will contrast well against the blue of the sky. The land also emanates a distinctly warm glow at this time of day, and you can use the complementary and opposite colour tones of orange/blue in the colour wheel to your advantage while shooting this type of light.
2. Blue Hour Mood
We are lucky as landscape photographers to have the opportunity to be able to capture both blue hour and golden hour during the same shoot! But talk about total contrasts in tone and feel - if golden hour is warm and radiant, then blue hour is cool and mysterious!
When should you shoot blue hour? To make the best of blue hour, I always recommend arriving EARLY for sunrise (at least 45 minutes beforehand) so you can make the most of the limited timeframe to shoot. The same goes with sunset, don’t pack up too early, stay until it’s almost dark so you can make the most of the last light of the day as well.

Cathedral Cove in Blue Hour (30 mins before sunrise), 2 min | f/8 | ISO 100
Shooting very early often allows you to showcase mountain peaks like Aoraki Mt Cook, which become illuminated by the first light of the day long before the rest of the landscape begins to show any signs of light reaching it.

Tasman Lake Mt Cook Blue Hour (45 mins before sunrise) 60 sec | f/11 | ISO 160
Blue hour light is extremely soft and forgiving, and since the sun is below the horizon, you don’t have to deal with big contrasts between your shadows and highlights like you might in golden hour. The sky takes on deep blue and purple hues, often with subtle pinks or oranges lingering near the horizon. These cooler tones create a calm, moody, and atmospheric feel that golden hour can’t replicate.

Lake Alexandrina Blue Hour (25 min before sunrise), 25 sec | f/11 | ISO 50
The lower light levels also let you use slower shutter speeds without overexposing. This is ideal for smoothing out water, capturing light trails, or creating motion blur in clouds without the need for adding Neutral Density Filters like you would need to in brighter lighting situations.
Tips for shooting Blue Hour:
Use a tripod - blue hour usually requires slower shutter speeds and longer exposures to successfully let enough light into your scene
Be in position to shoot at least 45 minutes before sunrise and after sunset
Experiment with long exposures smoothing water and creating cloud movement making the most of lower lighting levels.
3. Backlighting for dramatic effect
Backlighting occurs when your subject is between you and the light source, allowing you to create silhouettes, capture sunbursts or even show shafts of sun rays. Shooting directly into the light does create challenges with such a high dynamic range in the scene, but it can also produce dramatic results, instantly adding intensity with the strong contrasts between light and dark in the scene.

Backlit tree in Coromandel 1/100 sec | f/22 | ISO 125
Backlighting can simplify a scene by reducing subjects to bold outlines. Trees, mountains, or even rocks can stand out as striking silhouettes against a glowing sky.

Motukiekie Starfish Beach Sunset, 1/80 sec | f/14 | ISO 100
Pockets of fog and mist also light up beautifully when lit from behind, accentuating the depth in an image. It is much easier to shoot a backlit scene when the sun is lower in the sky around sunrise and sunset.

Misty Tree Silhouettes Milford Sound Road 1/640 sec | f/9 | ISO 200
One of my favourite ways to use backlighting is to add a sunstar into the scene for greater depth in the image by catching the moment the sun dips behind the landscape on a hill, goes behind a tree or cloud. These are best captured with a narrow aperture like f18 - f22, for more info on sunstars check out my comprehensive guide: 7 tips to create perfect sunstars.

Cherry Blossom Backlit Sunset, 1/60 sec | f/16 | ISO 250
Tips for shooting Backlighting:
Expose for the highlights - this prevents the sky from blowing out even if your foreground is darker. For very challenging scenes, you could choose to exposure bracket your shots
Find an object to block out the sun or to catch the edge of the object with a sunstar - trees, mountains, or rocks work well.
Experiment with different apertures - for a sunstar you’ll need use a narrow aperture (f/16-f/22), but if you want a dreamy glow a wider aperture is better (f/2.8-f/4)
4. Side lighting for texture
When the sun sits low in the sky, side lighting brings out incredible texture and dimension in the landscape. Shadows that appear sideways across hills, sand dunes, or fields reveal patterns that you’d never normally notice in midday overhead light. Side lighting creates contrast between light and shadow, giving a three-dimensional feel to an otherwise flat image, which help the viewer “feel” the contours of the landscape.

Waikato Rolling Hills, 1/25 sec | f/8 | ISO 100
Sidelit shadows can also be useful as leading lines in the frame, drawing your eye inwards. Unlike backlighting, which can push the subject into silhouette, or reverse lighting, which can look flat since it is so even, side lighting gives you a nice combination of both detail plus drama, making it the perfect middle ground.
Side lighting is fantastic for sculpting the landscape, revealing shape, texture and depth in a way that no other lighting direction can.

Waikato Tuscan Trees Side Lighting 1/40 sec | f/11 | ISO 100
Tips for shooting Side Lighting:
Use tools like PhotoPills to assess the angle of your location to find where you can incorporate a side lit shot, paying attention to how this might change at certain times of the year
Use side lighting to highlight repeating patterns like ridges, dunes, rolling hills, or even waves.
Strong side light often works best at sunrise or sunset when the angle is low to accentuate the contrast between highlights and shadows.
5. Reverse lighting for pastel hues
Most people get excited about clear skies, knowing there’s a lovely day ahead, but usually not photographers who’d prefer epic cloud formations to add interest to their scene! But, there is a way to make the most of clear skies, and that is to shoot in a direction close to 180 degrees opposite to where the sun is coming from. This allows you to incorporate the lovely Belt of Venus hues that appear on the horizon around sunrise and sunset, in other words reverse lighting.

Lake Hauroko Reverse Sunrise 60 sec | f/8 | ISO 100
My photography friend and I often joke that “Hugh saves the day” and what we really mean is that we will deliberately choose locations facing directly away from the sun when there are clear skies in order to capture these pastel hues.

Ben Ohau Winter Hues 1/10 sec | f/8 | ISO 100
With the sun behind you, the landscape in front receives direct, balanced light, reducing the overall dynamic range of the scene making it far easier to shoot a single frame with a balanced histogram. There are far less harsh shadows to deal with, so it is perfect for showing off colour and texture in a scene even in the darker parts of an image.

Twelve Apostles Reverse Sunrise 30 sec | f/100 | ISO 100
Taking an aerial sunrise or sunset flight is another time you can easily incorporate the Belt of Venus hues into your scene. Due to the height of your elevation above the ground, the hues are always more accentuated against a mountain backdrop from the air.

Mt Aspiring Aerial Sunrise Hues 1/500 sec | f/5 | ISO 400
Tips for shooting Reverse Lighting:
Look for elevated viewpoints (mountains, ridges, coastal cliffs) where you can see a clear horizon at an angle 180 degrees opposite the sun.
Use a polarising filter to make the pastel hues pop even more.
Include a strong subject in the foreground like peaks, lakes, or trees to anchor the colours of the Belt of Venus behind them.
6. Diffused & Moody Light
Cloudy, overcast, or foggy conditions might feel uninspiring at first, but they create some of the best opportunities for photography. While moody, subdued light isn’t usually what we hope to experience during sunrise and sunset, it’s perfect for shooting other scenes like waterfalls, forests and rivers during the day. It’s difficult to shoot a water scene with any sunlight coming in, as harsh patches of light will blow out the white water and also create dark shadows. Instead, diffused light softens contrast and eliminates harsh highlights, making colours richer and more even.
This is the perfect time to get out your polariser to further enhance the greens of the forest or mossy rocks, and reduce any reflection and glare on wet rocks or water.

Riwaka Resurgence 0.4 sec | f/8 | ISO 100
Moody weather can also help accentuate the richness of colours in nature, which would be overpowered or drowned out in sunny conditions. Take this dawn lupin scene below for example, the moody morning allowed the various colours of the lupins to pop against the brooding sky behind.

Lupins Moody Dawn 1/3 sec | f/10 | ISO 200
Foggy conditions can also add incredible atmosphere to a scene, highlighting details and patterns that might otherwise go unnoticed in brighter lighting conditions.

Fog Symmetry 13 sec | f/10 | ISO 50
Tips for shooting Diffused, Moody Light:
Use a polarising filter to reduce glare and boost saturation in flat light
Use mist and fog to simplify busy scenes and add a sense of mystery
Don’t pack up when the clouds or fog roll in, sometimes the most artistic shots happen in bad weather.
7. Reflected & Filtered Light
Not all light comes directly from the sun. Reflected and filtered light can create stunning effects if you know where to look. Light bouncing off cliffs, snow, or water can cast unique tones across your subject, while light filtering through trees or clouds can create beautiful beams or dappled patterns.
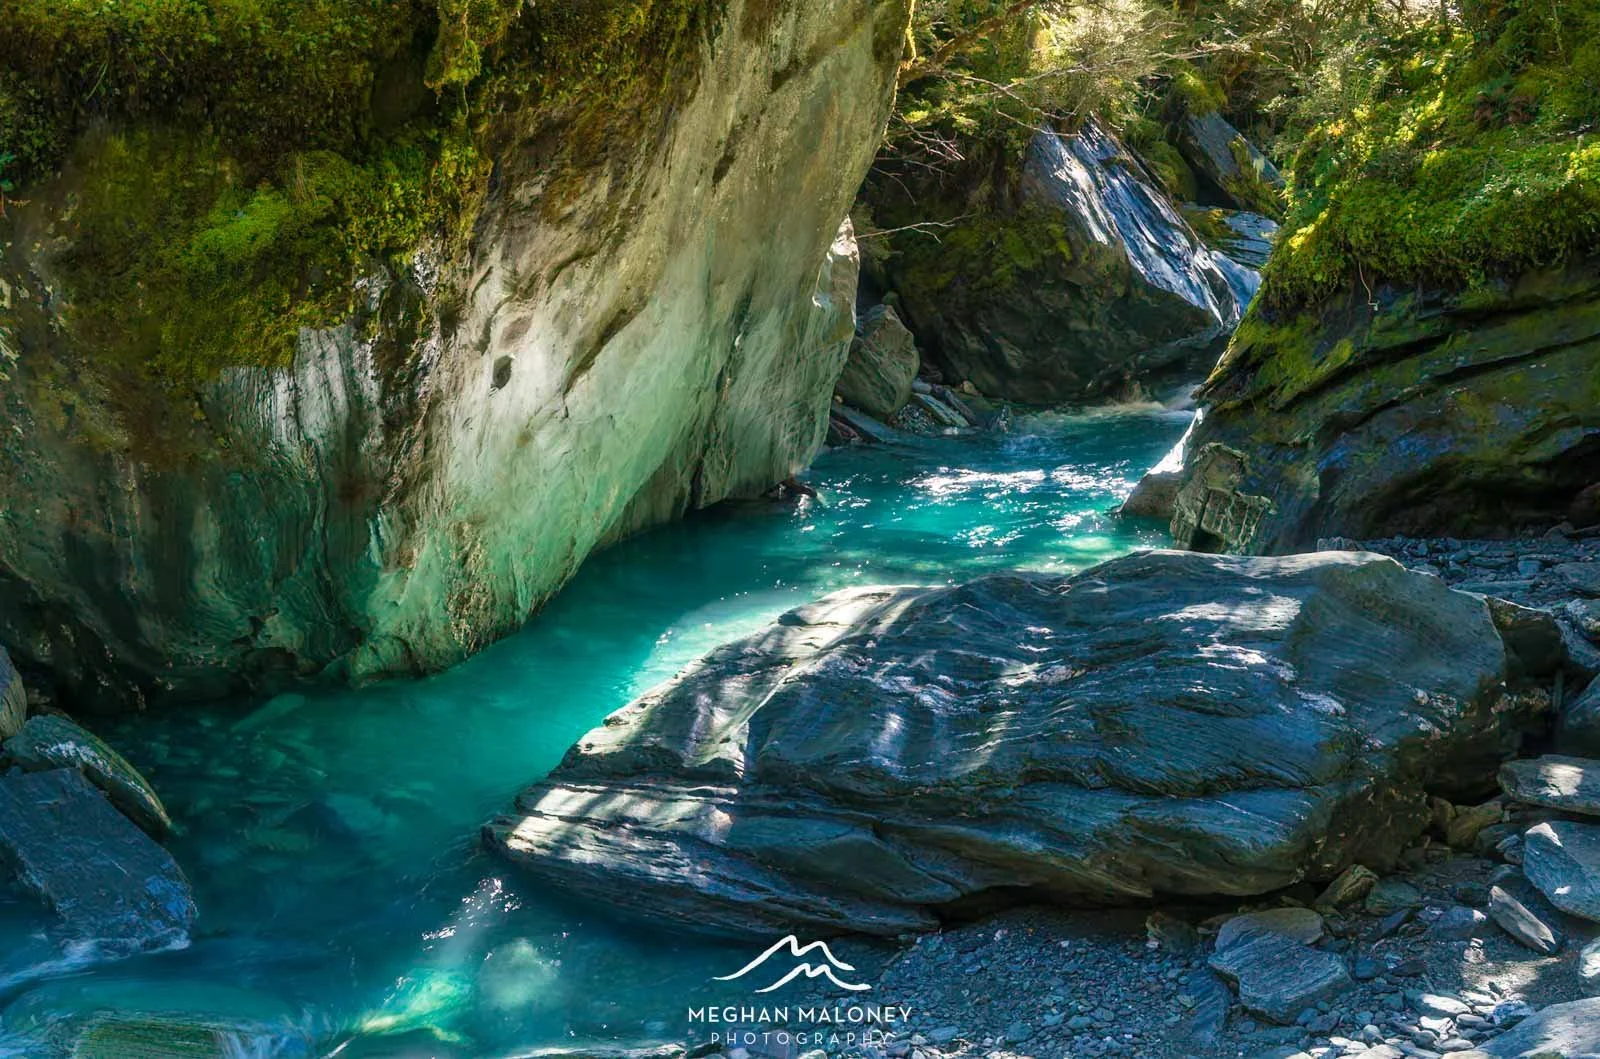
Rob Roy River Canyon 1/8 sec | f/10 | ISO 100
Secondary light sources enrich your photos with unexpected colour and depth. Think of glowing canyon walls or golden shafts of sunlight breaking through a forest canopy, or through the clouds.

Milford Road Light Rays 1/80 sec | f/11 | ISO 200
Forests themselves also look beautiful when the light source is more dappled and less direct and harsh. This can be achieved by utilising side lighting on the tree trunks and enabling sunlight that’s out of the frame to catch on foliage. It often works best when the sun is more diffused, i.e. only visible through high or intermittent cloud.
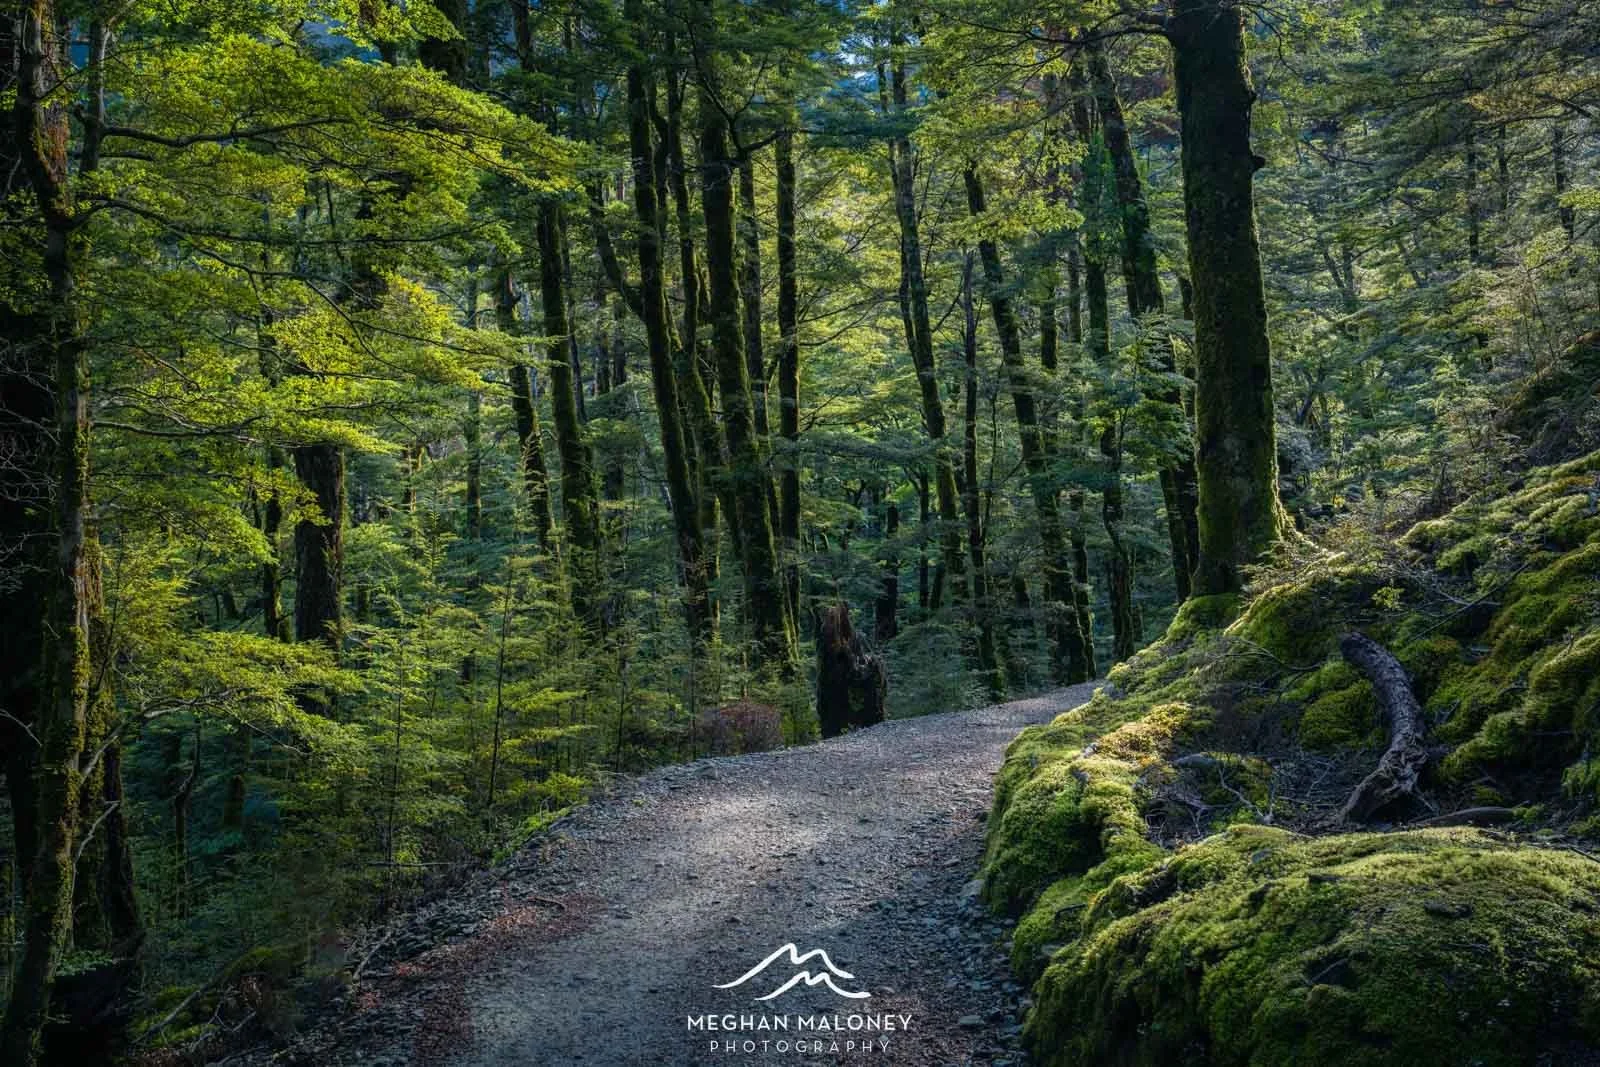
Routeburn Forest Dappled Light 1/10 sec | f/13 | ISO 400
Tips for shooting Reflected & Filtered Light:
In canyons or caves, look for walls lit indirectly by sunlight, they often glow with warm reflected tones
Shoot forests when the sun is filtering through branches for dappled light
Position yourself to capture sunbeams streaming through mist, fog or through the clouds for added drama.
In Conclusion
Mastering light in landscape photography isn’t just about chasing the obvious and easy lighting conditions, it’s about learning to see light in all its forms. From warm, golden sunrises to moody overcast days, from intense backlighting to the pastel hues of reverse lighting, every lighting situation offers a chance to create something unique. Sometimes a location will offer many different ways to present a scene when you position yourself at different angles over the course of the shoot, always keep an eye on how the light is changing.
The next time you’re out shooting, pause and look around. Ask yourself: Where is the light coming from? How is it shaping the landscape? With practice, you’ll start to see light not just as illumination, but as the brush painting the master strokes of your image.