10 Must-Visit Photography Locations Aoraki Mount Cook
Aoraki Mt Cook National Park is surely one of New Zealand's most spectacular natural attractions. Home to the country's highest mountain, Aoraki Mt Cook (3,797 metres), it offers breathtaking scenery to photograph from a range of unique viewpoints and locations. The fact that the area also falls within the Aoraki Mackenzie Dark Sky Reserve means you are also in one of the best locations in the world for capturing the night sky with stunning astrophotography.

In this blog post, we'll take a look at 10 must-visit photography locations to capture Aoraki Mount Cook and the surrounding Southern Alps peaks. Let's explore these now!
HOOKER VALLEY LOCATIONS
Easily NZ’s most favourite day walk in the South Island, this 10km return track is so photogenic that you’ll need to allow far more than the generic 3 hour return timeframe. The track is relatively easy but undulating and there definitely some sections that have a slight incline as well as short sections of stairs, so you’ll most certainly notice it if you are carrying all your camera gear and tripod. There are 3 swing bridges along the way which make for good markers of how far you are along the journey.
1. Hooker River
If you don’t mind a bit of scrambling, there are a few good places to shoot a long exposure of the river with the mountains in the background. The first spot is just before the first swing bridge, you’ll need to make your way down to the river carefully avoiding the spiky Spaniards bushes that are determined to get hold of you and prick you to pieces!

3 shots focus stacked 36mm (4 sec f/8 ISO 100)
The second spot is after the second swing bridge when the river is on your right, you’ll easily make out the spot as the river boulders are quite close to the track and Aoraki is in view nicely framed between two sides of the valley.

49mm 0.6 sec f/8 ISO200
The last spot to shoot the river is at Hooker Lake itself, you will need to walk to the far (western) side of the lake to where the river flows out of the lake. Using interesting rocks as foreground and a leading line into the peak of the mountain works well here.

3 shots focus stacked at 36mm, 2.5 sec f/14 ISO 160
2. Hooker Hut
If you have time, you can make a night of it and stay at the oldest (and cutest!) hut in the National Park. It’s been lovingly restored and sits well out of sight from the main track, about a 20 minute detour. It’s only a tiny hut with room for 8 and bookings are required, but I can’t imagine a more incredible place to wake up in.

If you are game enough, it’s also a brilliant spot to shoot a Milky Way panorama from July onwards. This shot was taken around 3am in late July. It was minus six degrees but incredibly calm, though I still felt pretty cold after two hours standing out in it!

2 row vertical pano 24mm (Sony 24mm GM) 8 sec f1./8 ISO 6400
3. The tarn
After the last swing bridge, and not far from the end of the track is a little tarn on the right hand side, and if there’s water in it (note it can be frozen in winter too!), you’ll have a great view of Aoraki reflected behind the hill.

4. Hooker Lake
The lake itself is 100% worth your effort to visit, so make sure you allow yourself enough time for the whole track. I’ve found sunset the best time to visit this spot as the last light hits the peak of Aoraki and seems to dwell there for quite some time if conditions are right. As it’s a glacial lake, you can also have icebergs floating around providing foreground interest, and if it’s calm the reflections are to die for!

Be warned though, in winter it can be completely frozen (as I found out on one trip with my family - that’s my kids standing out on the ice, safely I might add and quite close to shore, there were some very silly people going much further out!).

It’s also a great spot for astrophotography, but you’ll need to wait until later in the season for the Milky Way to line up above the peak straight after sunset (think mid August) and the Milky Way will be very high in the sky so you’ll need a wide angle lens if you want the core of the Milky Way in the frame in one shot.

10 shots stacked for noise 16mm 25 sec f2.8 ISO6400
TASMAN VALLEY LOCATIONS
Exploring the Tasman Valley is is a good shorter option if you don’t have enough time to walk the full Hooker Lake track and it's a great spot for sunrise. I prefer sunrise to sunset here as the light hits the peak of Aoraki rather than disappearing behind the mountains and the area being in full shadow. There are several places you can shoot from including the two lakes up the hill (be warned it’s quite a short sharp climb to get up here), and the viewpoint looking over the lake actually looks south away from Aoraki but is a beautiful view and you can see a long way down the Tasman valley from here.

76mm 2 shots stacked 1/40 sec f/8 ISO 100
5. Tasman Glacier Lake
My favourite location to shoot here is down at the river terminal, it’s a very easy 2km return track to walk apart from the last few metres where you have to scramble down some reasonably big boulders to get down to the lake. The benefit of being at lake level is that you can get great reflections and often ice in the foreground in winter which can make a much more interesting foreground.

Icebergs come and go, from day to day and week to week regardless of the season. It all depends on whether there has been a recent calving from the glacier, so it’s generally just luck as to whether you’ll see any. I’ve been there with almost none, a few and a lot, each visit is unique!
This is also a brilliant spot for astrophotography, even without the full Milky Way core in the frame, if you can get a calm night the reflections of the stars among the icebergs are simply incredible, this was shot in late August.

4 vertical image panorama Sony 24mm GM 6 sec f/1.8 ISO 6400
On the drive into Tasman Valley, the road leading to Mt Blackburn also makes a great shot too. As with all road shots, you need to be very mindful of traffic and ideally have someone on lookout while you are taking shots.

OTHER LOCATIONS AT AORAKI MT COOK
6. Red Tarns
This is a relatively steep 325m elevation, 4km return hike which takes about 40 minutes from the main village up towards Mt Sebastopol, but the reward is an elevated alpine plateau and tarn that can give lovely reflections of both Mt Sefton (left) and Aoraki (right) in the distance.

Although I haven’t personally shot at any of these locations, Kea Point offers a fairly easy walk from the Village (3km return, 90m elevation), whereas Sealy Tarns (5km, 550m elevation approx 3 hours return) offers a much higher vantage point, but at certain times of the year Sealy Tarns may not be accessible without full-on mountaineering gear, and you'll want to brace yourself for the 2,200 steps to get up there!
ALONG THE ROAD TO AORAKI MT COOK
7. Road shot locations
There are several locations on the road to Mt Cook to capture views that include the road snaking towards it (and who doesn't love a good leading line!) HOWEVER, road shots should only be attempted if you have someone to provide traffic management for you by keeping a lookout to see what’s coming from both directions.
The first spot is so popular that you can’t miss it as there is a very obvious parking area, it’s a wide open view but by zooming in a little you can compress the distance between you and the mountain, it can be a great shot at any time of the day but particularly in golden hour.

The second spot is just after a bridge so I recommend parking safely somewhere just after the bridge far enough off the road not to be a hindrance to other cars. This spot looks great during golden hour when the setting sun is lighting up the various craggy faces of the Aoraki's peak.

The third spot allows you to pull off into a reasonably large parking area on the right hand side of the road and means you can incorporate both the winding river and lower Tasman valley into your foreground - it's also a wide enough view to suit a panorama.

8. Peter’s Lookout (Tapataia Mahaka)
Only 10 minutes from the turnoff on the road to Mt Cook you’ll find the famous viewpoint: Peter’s Lookout (Tapataia Mahaka). This has been very well developed to allow a lot of people to enjoy this spot, and it is one of my favourite views of the mountain. You’ll need a long lens (think 150mm zoom with a full frame lens) to take advantage of bringing the mountain closer otherwise it will appear tiny in your shot. I prefer to shoot here during sunrise as again the right hand side of the mountain is nicely lit up by the first pink light and then the whole area turns golden once the sun is up (regardless of the season).
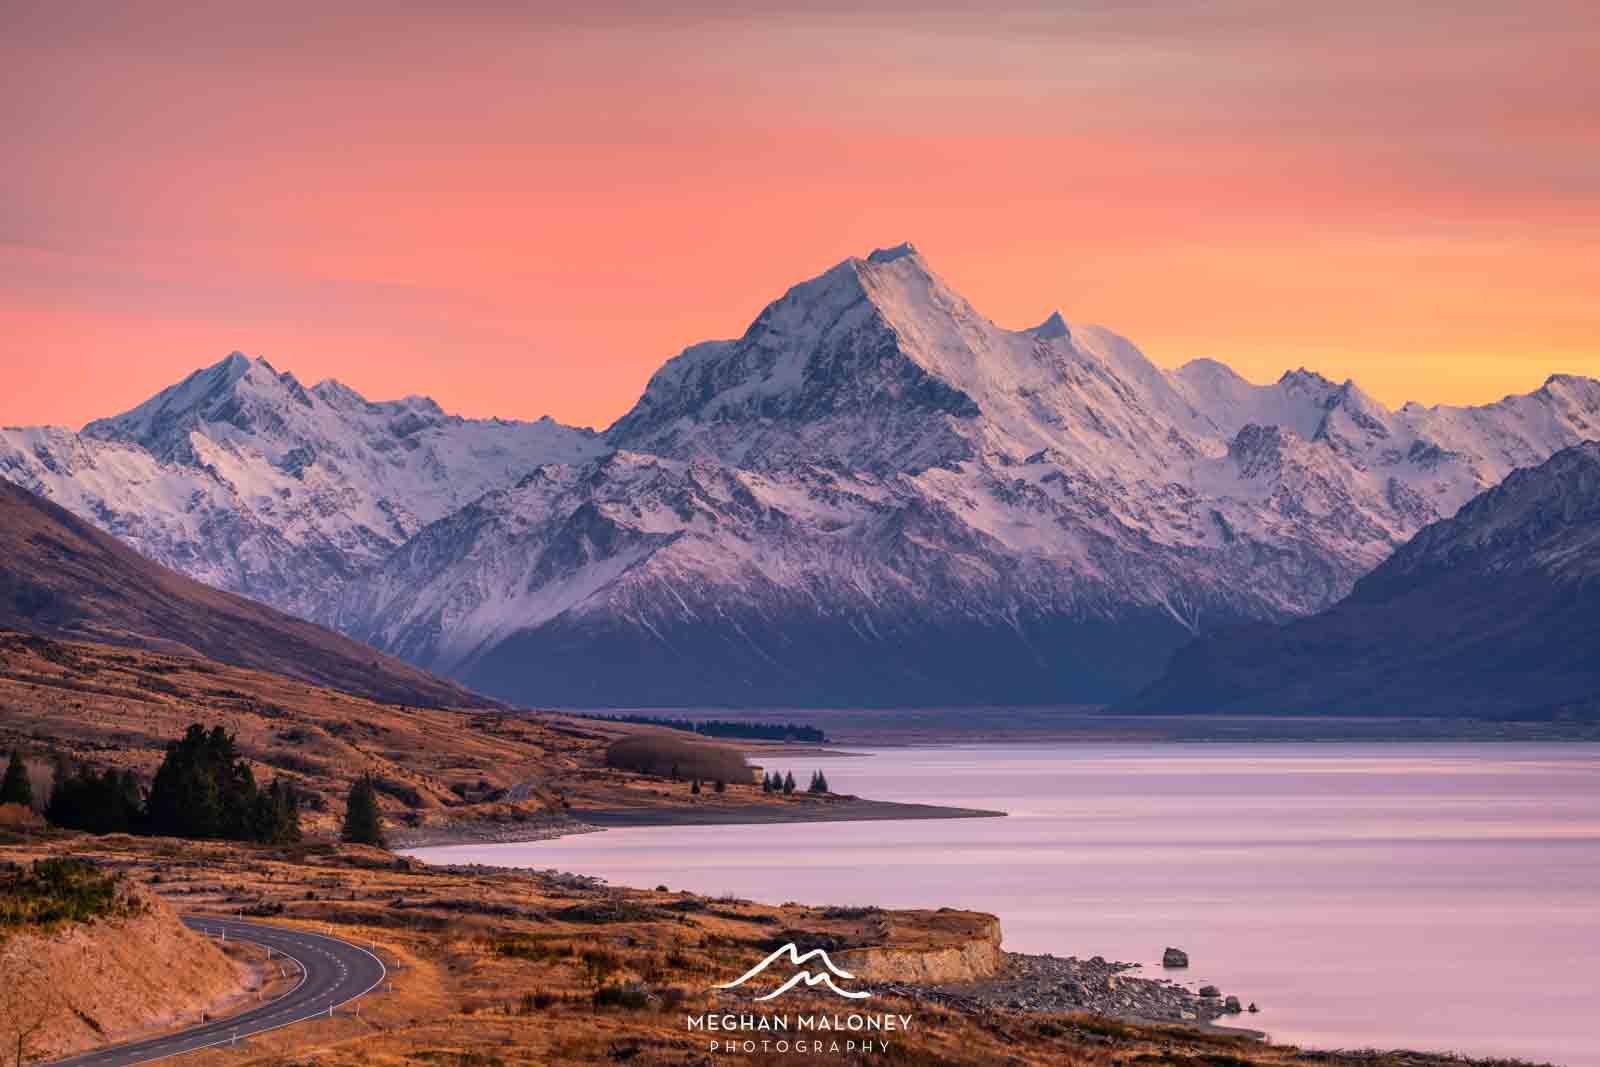
191mm 20 sec f/16 ISO50
Daytime shots can look great form here too though, especially on days when it’s really calm or the aqua of Lake Pukaki is really visible. HOT TIP: make sure to use a circular polariser to reduce the atmospheric haze and make the mountain stand out more against the sky.

170mm 1/320 sec f/8 ISO 100
You can also shoot the curve of the road leading to the mountain from here, but it’s really important that you have someone looking out for traffic here as there’s not much visibility (especially from behind though you can hear cars coming from a long way off).

190mm 1/13 f/11 ISO 160
FROM FURTHER AWAY
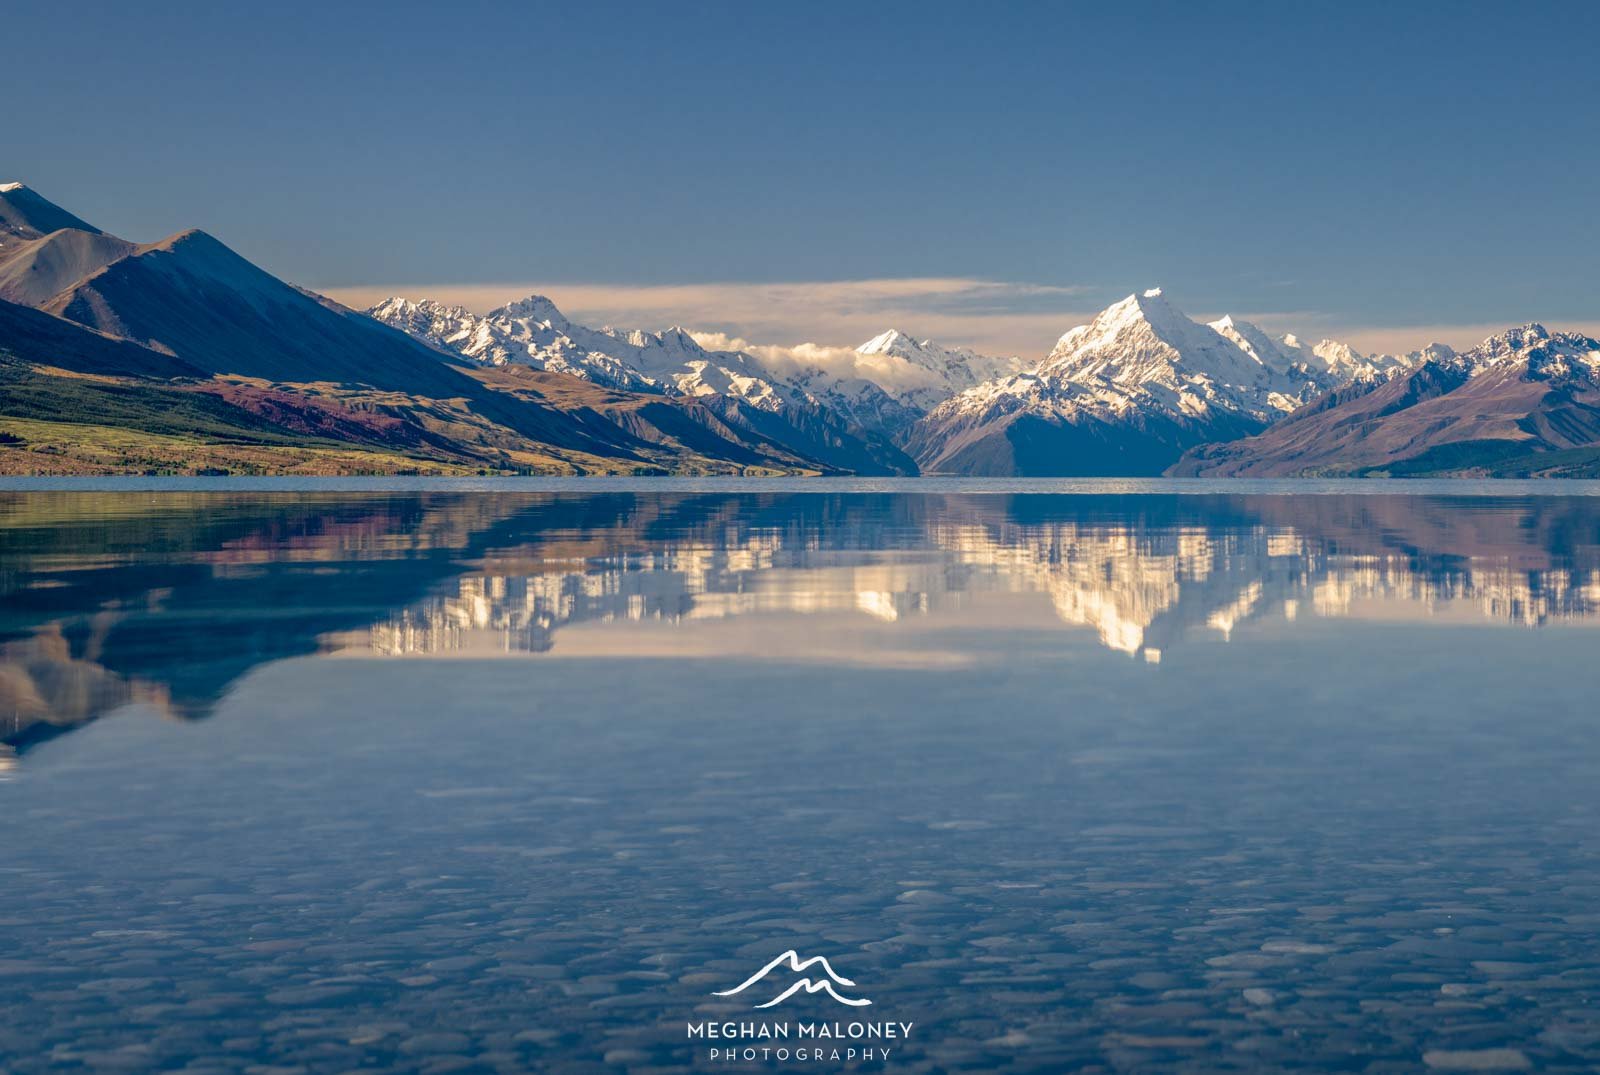
9. Lake Pukaki
On a calm day, the reflections of Aoraki Mt Cook in Lake Pukaki can be quite incredible. And even if it’s not calm, the colours of the lake can often be the most brilliant and unbelievable aqua colour which gives you great foreground interest. You can park at the visitor centre or further up the road towards Tekapo at the carpark on the corner of Hayman road where you can get the little island in view as well. Taking a drive up the eastern side of the lake on Hayman Road can also be worth it for some uniquely different angles of the mountain. If you can time it to be there at sunrise or sunset, you might even be treated to a brilliant display of colour as well!

120mm 1/2 sec f/8 ISO 100
For a challenge, one very calm afternoon I attempted a focus stack to include the lovely stones visible underneath the water. This involved lying on my stomach on the ground as my tripod didn't go low enough and shooting about 5-6 shots at different focus points - I love how it turned out!
Focus stacked image of 6 shots, 70mm 1/160 sec f/11 ISO100
10. Aerial views of Aoraki Mt Cook
If you have the budget and time, I highly recommend a scenic flight or a glacier heli-hike for a completely different vantage and views of the mountains, which also allows you to see over towards the West Coast and the Glaciers (a view that you simply can’t get from the ground). The best time of the day to fly for photography is at sunrise or sunset, and I always take my Sony f/2.8 24-70mm GM lens with me as my lens of choice. I find the focal length is good for both wider and close up shots and it shoots well in low light - check out my ‘how to take great aerial mountain shots on a scenic flight’ post for lots of tips on how to take good shots from the air.

38mm 1/250 sec f/4 ISO 500
I personally prefer an evening flight so that you can capture the golden light looking out towards the West Coast, but morning flights will offer more options to capture the river braids around Tekapo on the way there or back which also look amazing. My airline of choice is flying with Air Safaris (who are based out of Tekapo). I've flown on sunrise and sunset flights with them multiple times when hosting landscape photography workshops in the region at different times of the year and have always been blown away with the experience and the images I've been able to capture.

If you want to have the option to land on a flight, there are several glacier heli-hike options with Mt Cook Ski Planes, I’ve landed up the top of the Wigley glacier twice, once on a plane in/heli out scenic flight, and more recently on a heli-hike experience where we actually were able to go inside an ice cave and just soak in the views from 2,200 metres up.


16mm 1/5000 sec f/8 ISO 250
ALLOWING TIME FOR THE BEST SHOTS
I highly recommend staying a few days in Aoraki Mount Cook National Park especially if you want to be close enough to achieve sunrise and astrophotography within the region. The weather in these mountains changes incredibly fast so if you want to ensure conducive conditions you may have to allow a few days for bad weather to blow through. If you have a campervan you can stay at White Horse Hill campsite, otherwise there are several motel and higher-end options like the Hermitage available within the Mt Cook Village, or another alternative is to stay in Twizel which is only about 45 mins drive away.
If you loved these images, check out more of my favourite Aoraki Mt Cook landscape photography images for purchase on print and canvas or via digital download in my Aoraki Mt Cook Gallery online print store.