Are you using the Histogram? Top Landscape Photography Tip
As a photographer, capturing the perfect shot in camera is not only about good composition but mastering exposure in camera to achieve optimal exposure, ensuring your photos are well-balanced in terms of light and detail. Are you using the histogram when you're out shooting landscapes? If not, you should be! It’s the key to well-exposed RAW images that will allow you to maximise the potential to create stunning edited images, so let's explore this now!
What is a Histogram?
A histogram is a graphical representation of all the tones in your image. It shows how the pixels are distributed in your photo at every brightness level, from black (0% brightness) right through to white (100% brightness). A histogram is broadly divided into three main sections:
Shadows: The left side of the histogram represents the darkest areas of your image
Midtones: The middle part represents the mid-range brightness values
Highlights: The right side represents the bright areas of your image

How to Read a Histogram
Understanding how to read a histogram is the first step in knowing how to use it effectively. Here's how to interpret what you're seeing on the graph:
Balanced Exposure: A well-exposed image will have a histogram that spans across the entire range, without bunching up on either the left or right edge. This indicates that you have a good distribution of shadows, mid-tones, and highlights - this is much easier to achieve during the day when there is more light in general. At either end of the day during sunrise and sunset, the contrast is much more pronounced, usually this means you will be faced with a bright sky and a dark foreground.

Underexposed Image: If the histogram has more data to the left, it means that there are a lot of dark pixels, indicating an underexposed image. The details in the shadow areas might be lost if your histogram is hitting the left hand side of the graph. In Lightroom this can be seen as blue areas, when you click on the triangle to the top left of the histogram graph. If I was only going to shoot one image rather than bracketing, I would usually shoot underexposed like this. Why? Because there is still some colour data contained even in the darkest part of an image, and lifting your exposure and shadows will help bring this to light.

Overexposed Image: If the histogram is skewed to the right, then there are a lot of bright pixels, resulting in an overexposed image. The details in the highlights might be lost altogether if your histogram is touching the right hand side (this is known as highlight clipping as shown by the red in the image below). THIS IS SOMETHING TO AVOID AT ALL COSTS - particularly in your skies during sunrise and sunet. If you shoot with any part of your image hitting the right hand side of the histogram you will end up with pure white data in those pixels, and when you try to reduce the highlights and and whites this part of your image is likely to turn grey as there is no colour tones to be found in these pixels.

Using the Histogram when Shooting
Most cameras will allow you to cycle through the shooting display options so you can have the histogram visible when you are out shooting, so I recommend finding how you can easily view this in the field. On Sony cameras, the histogram is visible in the bottom right hand corner, in some other models the histogram takes up a lot of the usable screen space so this is a lot less user friendly.

Sony Models

Another brand camera
If you find that you can't shoot with your histogram on in your live view, at least cycle through your playback display info to the histogram view to make sure you are on the right track by assessing the results here.

How to overcome a challenging Histogram
Landscape lighting conditions can present very challenging histograms, especially at sunrise and sunset when foregrounds are dark and the sun is low in the sky. The latest best mirrorless cameras have amazing dynamic range capacity these days, and to to understand how capable your camera is I suggest you check your model’s abilities online at a site like DXOMark i.e. for referencemy Sony Al7R V shows the best possible score at 15 stops). But even with the best camera, sometimes it’s just not possible to fit the scene within the bounds of the histogram without extra assistance.
Here are my top 3 tips for reducing the total dynamic range in your image's histogram for better results
Option 1: Use a graduated filter
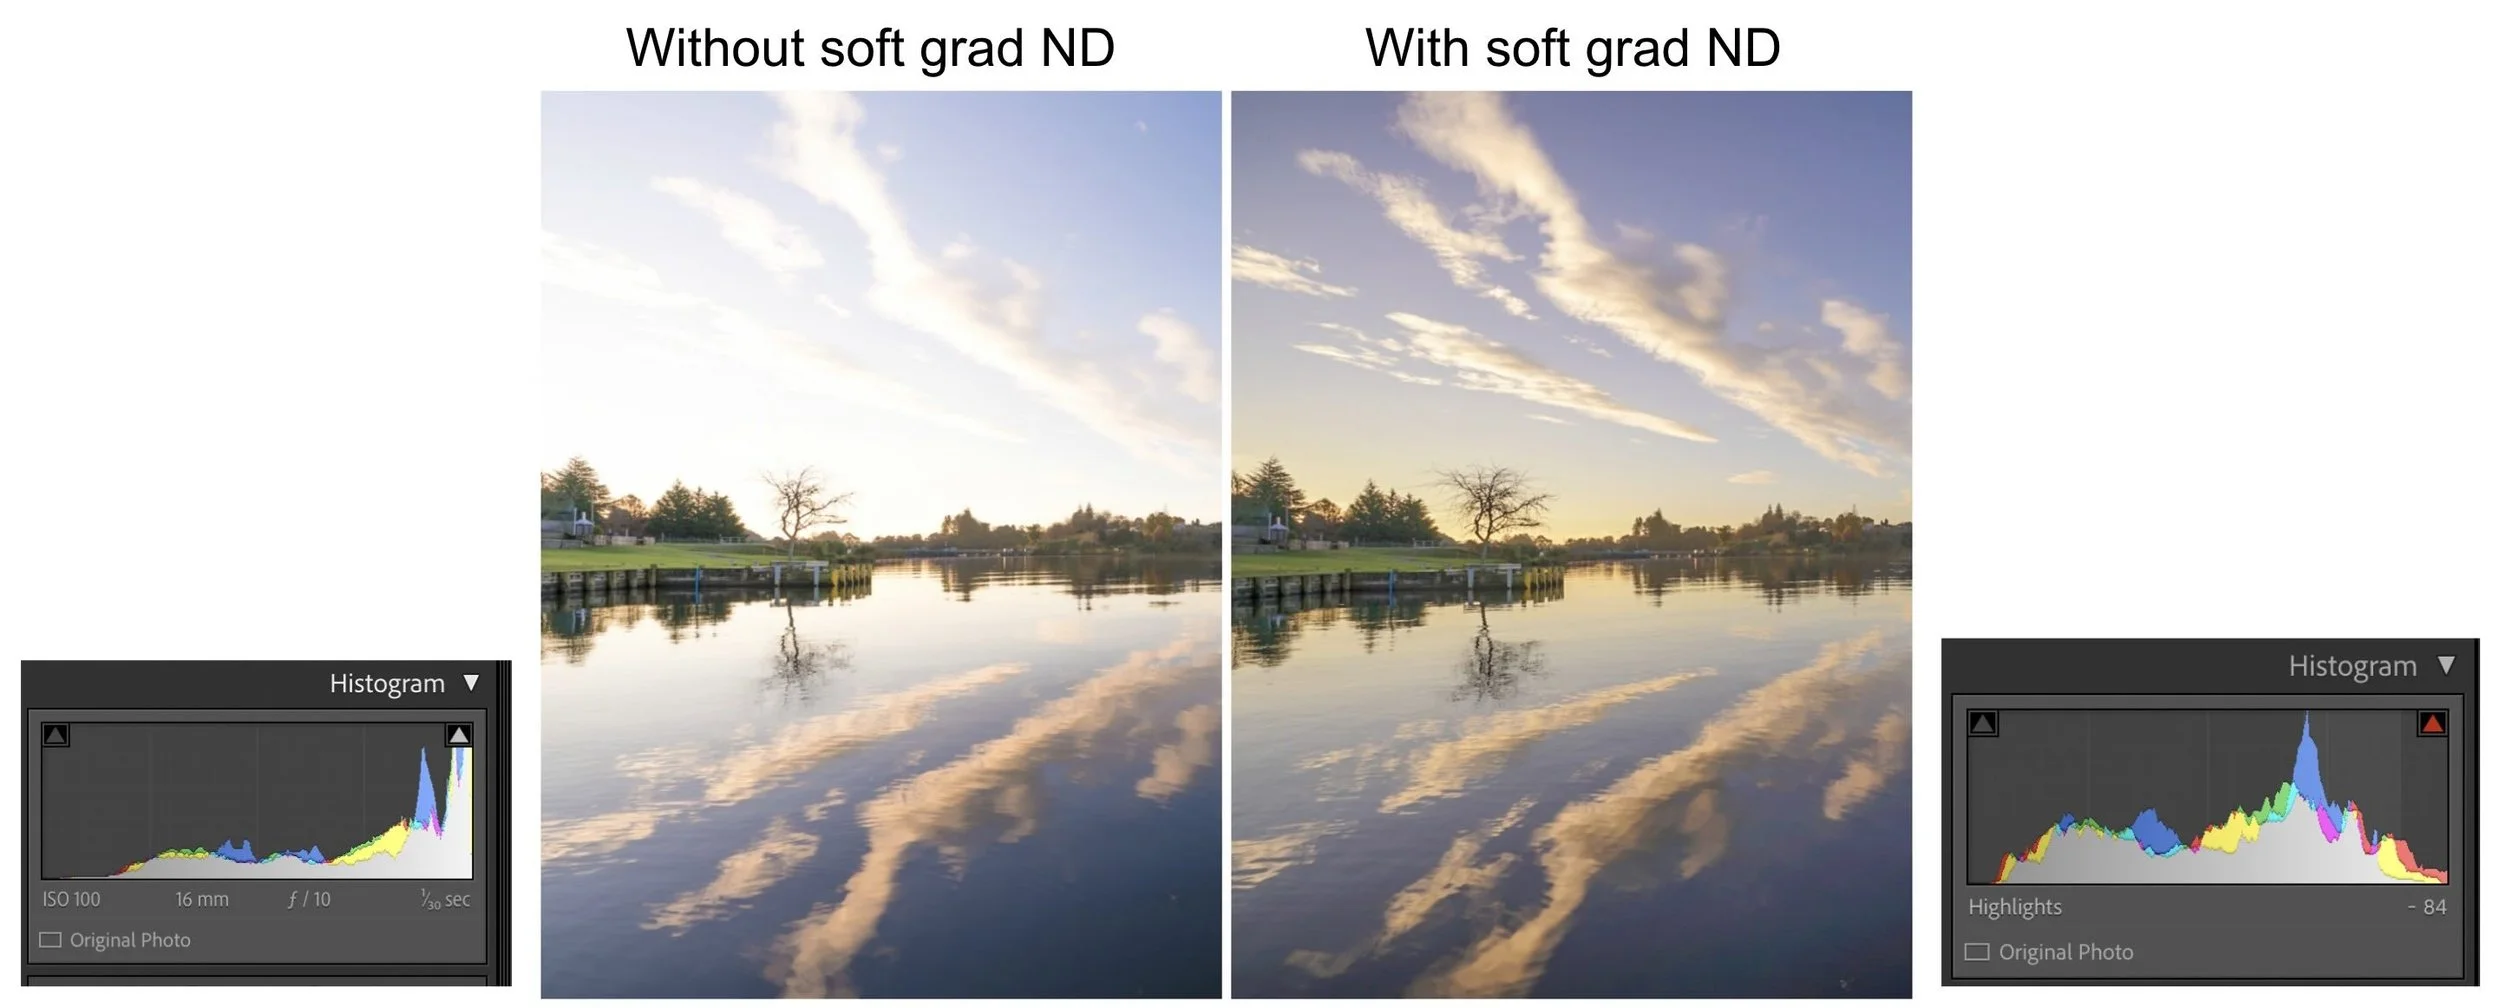
A Graduated Neutral Density filter (GND)is something I use regularly in my landscapes to darken the brightest part of my scene (usually but not always the sky) so that there is less difference overall between the darkest and lightest part of the scene. It has a darker area of glass in one half which transitions gradually (hence the name) to no darkness. The beauty of using this filter is that you can move the filter around to suit the scene you are shooting. I mostly use a 3-stop GND as I find this normally gives me enough to compress the histogram in to fit everything within the bounds of the graph. To learn more about using a graduated filter in the field and different versions of this filter check out this post: Don't leave home without a graduated filter.

Kase Wolverine GND3-stop filter
Option 1 is my preferred option as it means you generally only have to capture your scene with one image (which ultimately means less editing and less space taken up in your image library). Here is a real life example of using a graduated filter in the field to improve the histogram.
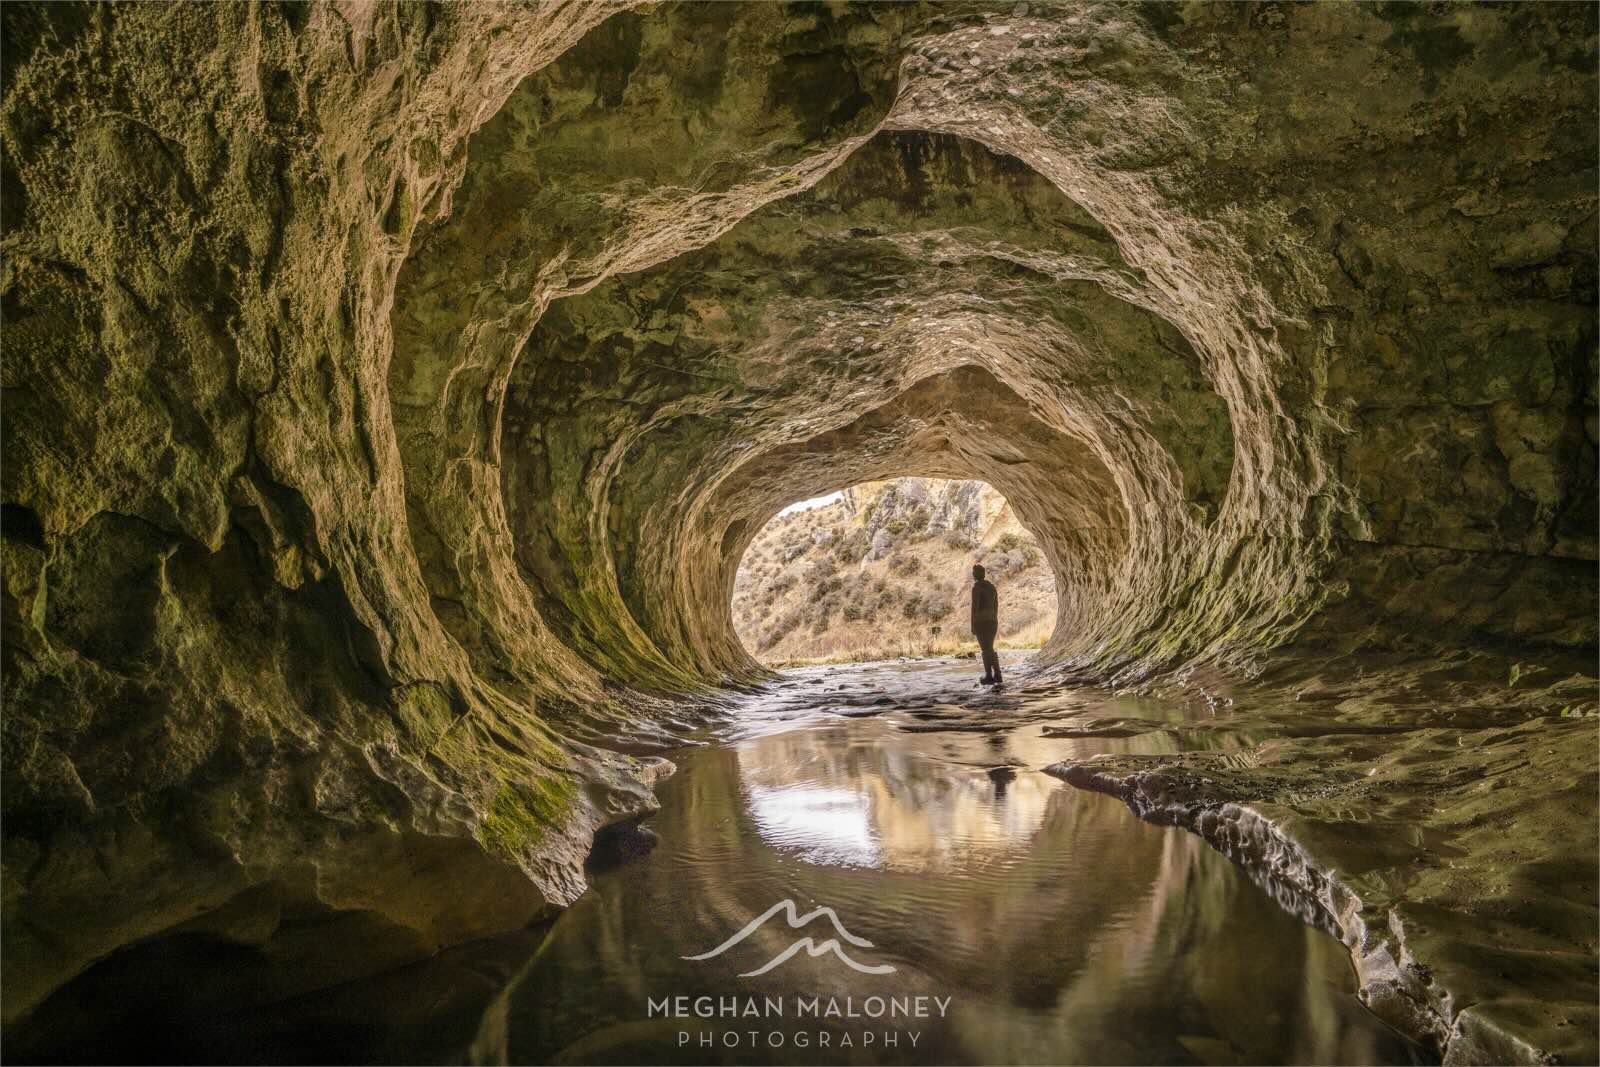
What limitations are there? If you have a non-linear bright section of the image then a graduated filter won't work well - see the example of an image below where the cave entrance is the brightest part of the shot and is a round section right in the centre of the image. Also, if you have anything that juts up above your horizon, this will naturally be darkened also, however with the latest Lightroom tools it’s very easy to either brush some exposure back into these areas when you are editing later, or use the Select Sky Masking Tool - see Option 3.
Option 2: Take different exposures (bracketing)
Another option is to take a series of shots at different exposures so that one is correctly exposed for the darkest areas, one for the mid-tones and one for the lightest part. You can either do this manually by changing the shutter speed to give you the 3 shots: one skewed to the left of the histogram (this would be exposed for the sky), one more in the middle (your mid tones), and one skewed to the right (for your darker foreground), or your camera may have an automatic option which allows you to choose the number of shots and the total exposure value difference between the darkest and brightest shot. Best practice means that the greater the difference between light and dark in your scene, then the more shots you should take.
This image is shot in a very dark cave using 5 different shutter speeds, with shots taken at 1/4 second, 1/2 second, 1 second, 2 seconds and 4 seconds and bracketed together in HDR mode. This was so I could use the fastest shutter speed for the outside of the cave (where it was brightest) and the longest shutter speed for the inside of the cave once the image was lightened.

The result of the 5-shot bracketed and edited image:
For a 1-stop exposure value difference, you might only need 3 shots. But for a very contrasting scene where there are 2 or more exposure stops you will probably want to increase the number of images to 5, 7 or 9.
Putting this into Lightroom, you can blend the exposures together using the Edit: Photomerge/HDR function.
What limitations are there? If you have any movement in your scene, moving water (waterfalls/rivers/waves) or foliage (leaves on trees) it can be hard to blend the images successfully, and you may experience ghosting outlined in red in the image below), this is where the HDR process can't match the pixels between the images due to movement. Sometimes this might not be a problem if it's not obvious but if it is, the resulting bracket might not be usable.

Another option would be to blend the different exposures in Photoshop but that requires more technical know-how.
Option 3: Use a Linear or Sky Filter in Lightroom
So long as your sky isn’t blown out based on the histogram, you can usually recover good detail from the sky during editing. And even if I use a graduated filter in the field, often I will still use a filter in Lightroom to further improve the brighter parts of the scene.

My general approach to editing a sky would be to reduce highlights a little, perhaps even exposure and sometimes add a bit of dehaze to make the sky pop. Using dehaze is best in scenes that have a combination of clouds and sun not so much a clear sky like in the image above.
What about images with white clouds and the sun in frame?
Are there any times when you can accept highlight clipping in a RAW image? Imagine you are shooting a scene which includes the core of the sun or a day with puffy, white clouds. In this instance there are whites that are naturally occurring in nature so it is OK to accept a histogram with a small amount of pure white data - i.e. the histogram showing a small amount hitting the right hand side of the graph.

In Summary
I hope you now feel more confident understanding and using the histogram in your photography for a more well-balanced exposure in camera. When you are out in the field, it is crucial to getting the best possible RAW file to work with so you can maximise your post-processing options later, so use the histogram as your best friend for nailing exposure every time!
Want to master the art of landscape photography? Check out my range of Online Landscape Photography Courses.