
Focus Stacking Showdown: Photoshop vs Luminar Neo
Focus Stacking Tools: Photoshop vs Luminar Neo
Focus stacking is one of the most useful techniques for landscape, macro, and foreground-to-background compositions where a single frame can’t give you sharp focus throughout the scene. By combining multiple images focused at different distances, you can produce a final file with edge-to-edge sharpness, and you can learn more about ensuring sharp focus in the field with my online course: Improve your Focus: Practical Tips for Sharp Shots.
I was pleased to discover that Luminar Neo includes Focus Stacking, because it opens up a faster, more streamlined workflow option, especially fif you want a quick, easy approach. But how does it compare with Photoshop, which has long been my go-to for serious focus stacking work?
After testing Photoshop & Luminar Neo across simple and complex stacks, the answer is: it depends on the situation.
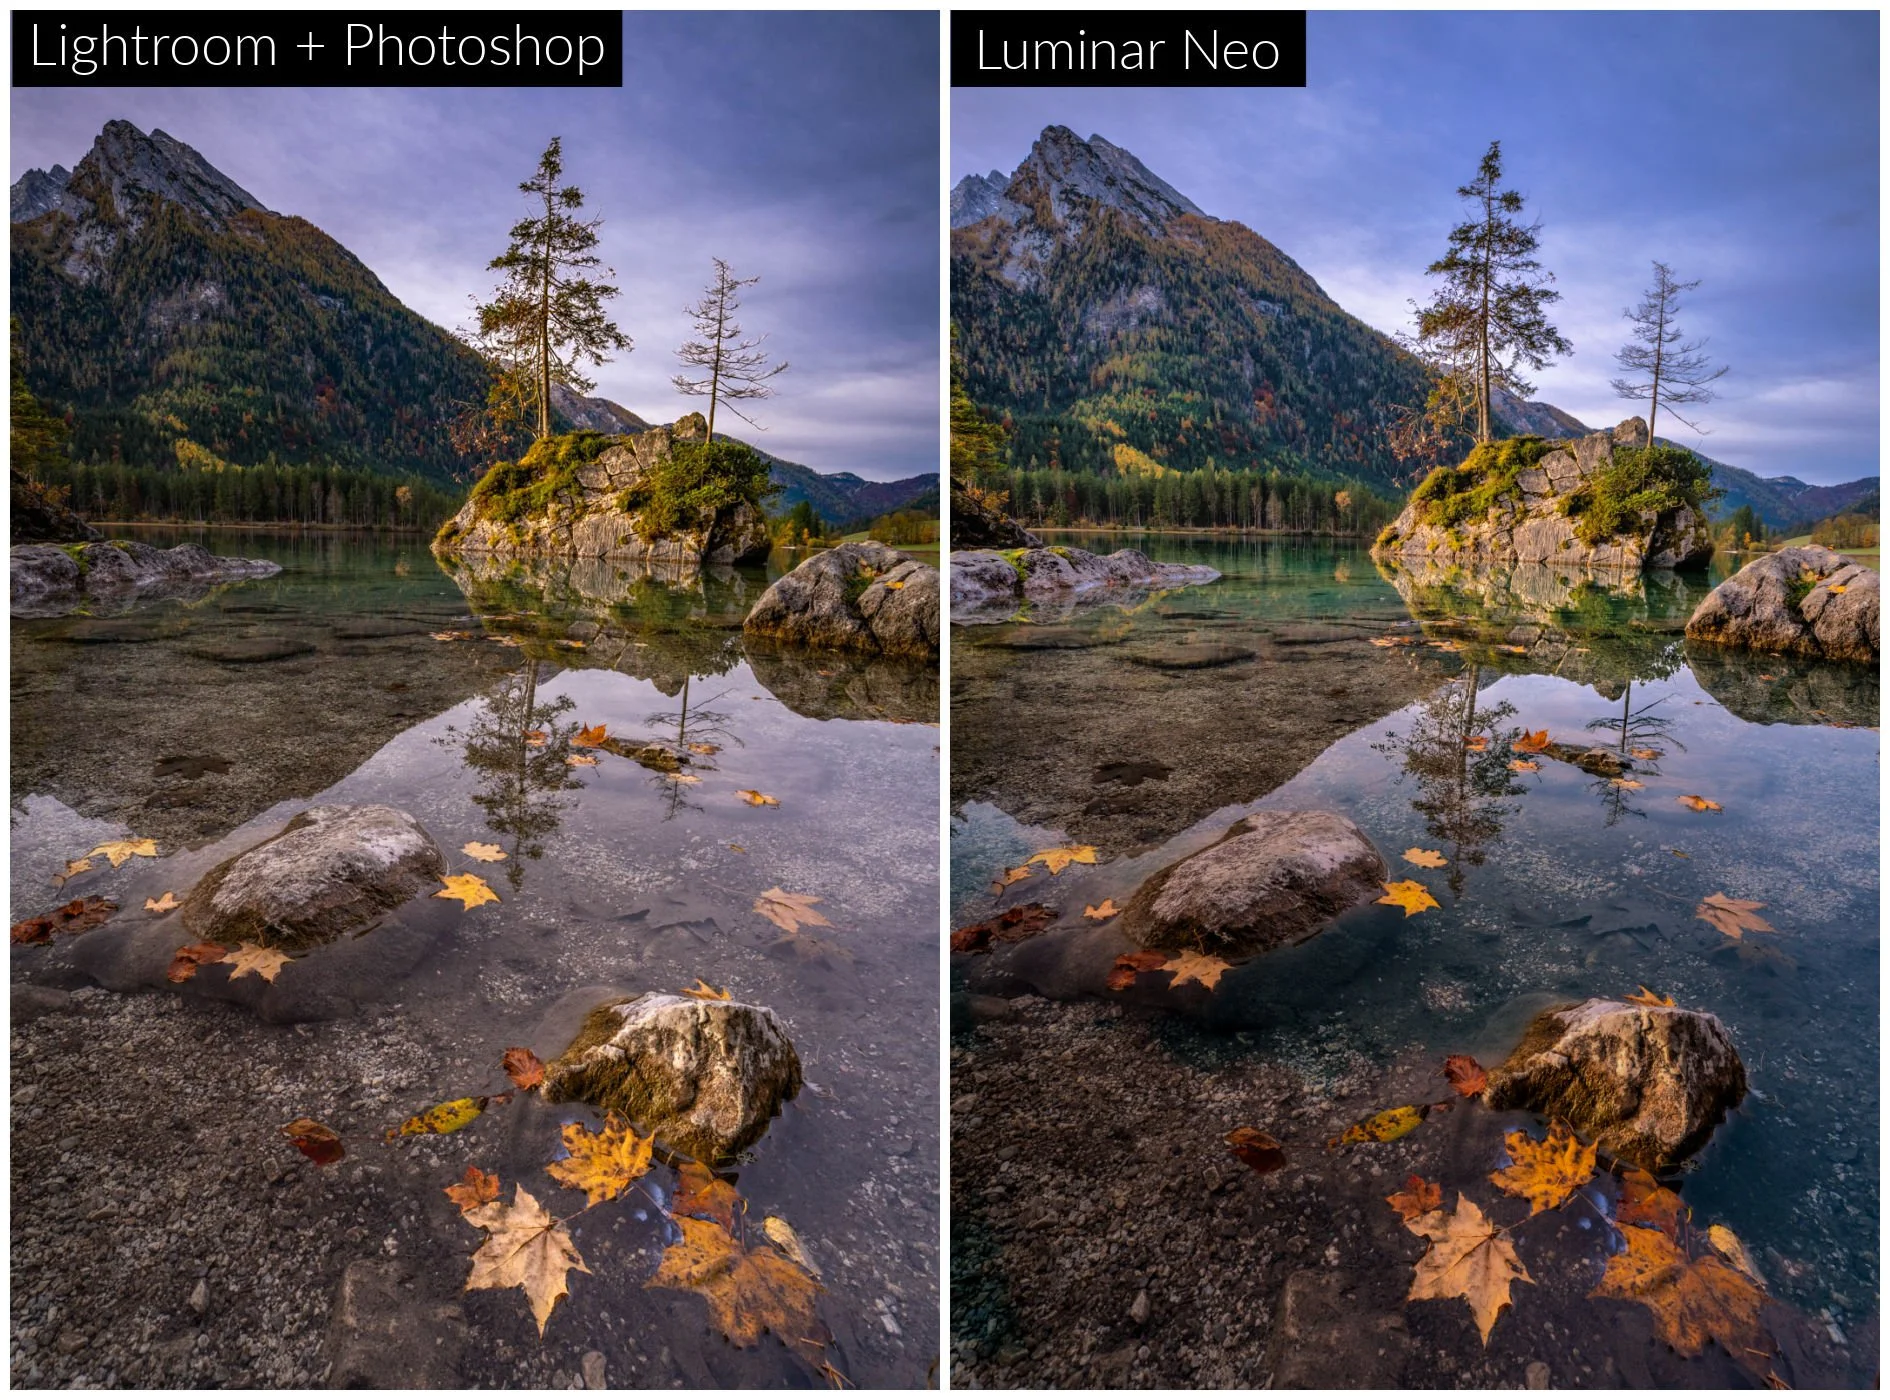
Luminar Neo wins for edge cropping
One of my long-standing frustrations with focus stacking in Photoshop is that even when shooting on a tripod with no visible movement between frames, the Auto-Align process slightly shifts pixels and always creates transparent edges. That means you always need to crop a few pixels around the border after blending. It’s not a deal breaker, but when you compose tightly in camera, losing edge pixels can be a bit annoying.
Luminar Neo does not introduce these transparent edge borders in the same way, so you can keep your full frame after stacking. From a composition and cropping standpoint, that’s an advantage.
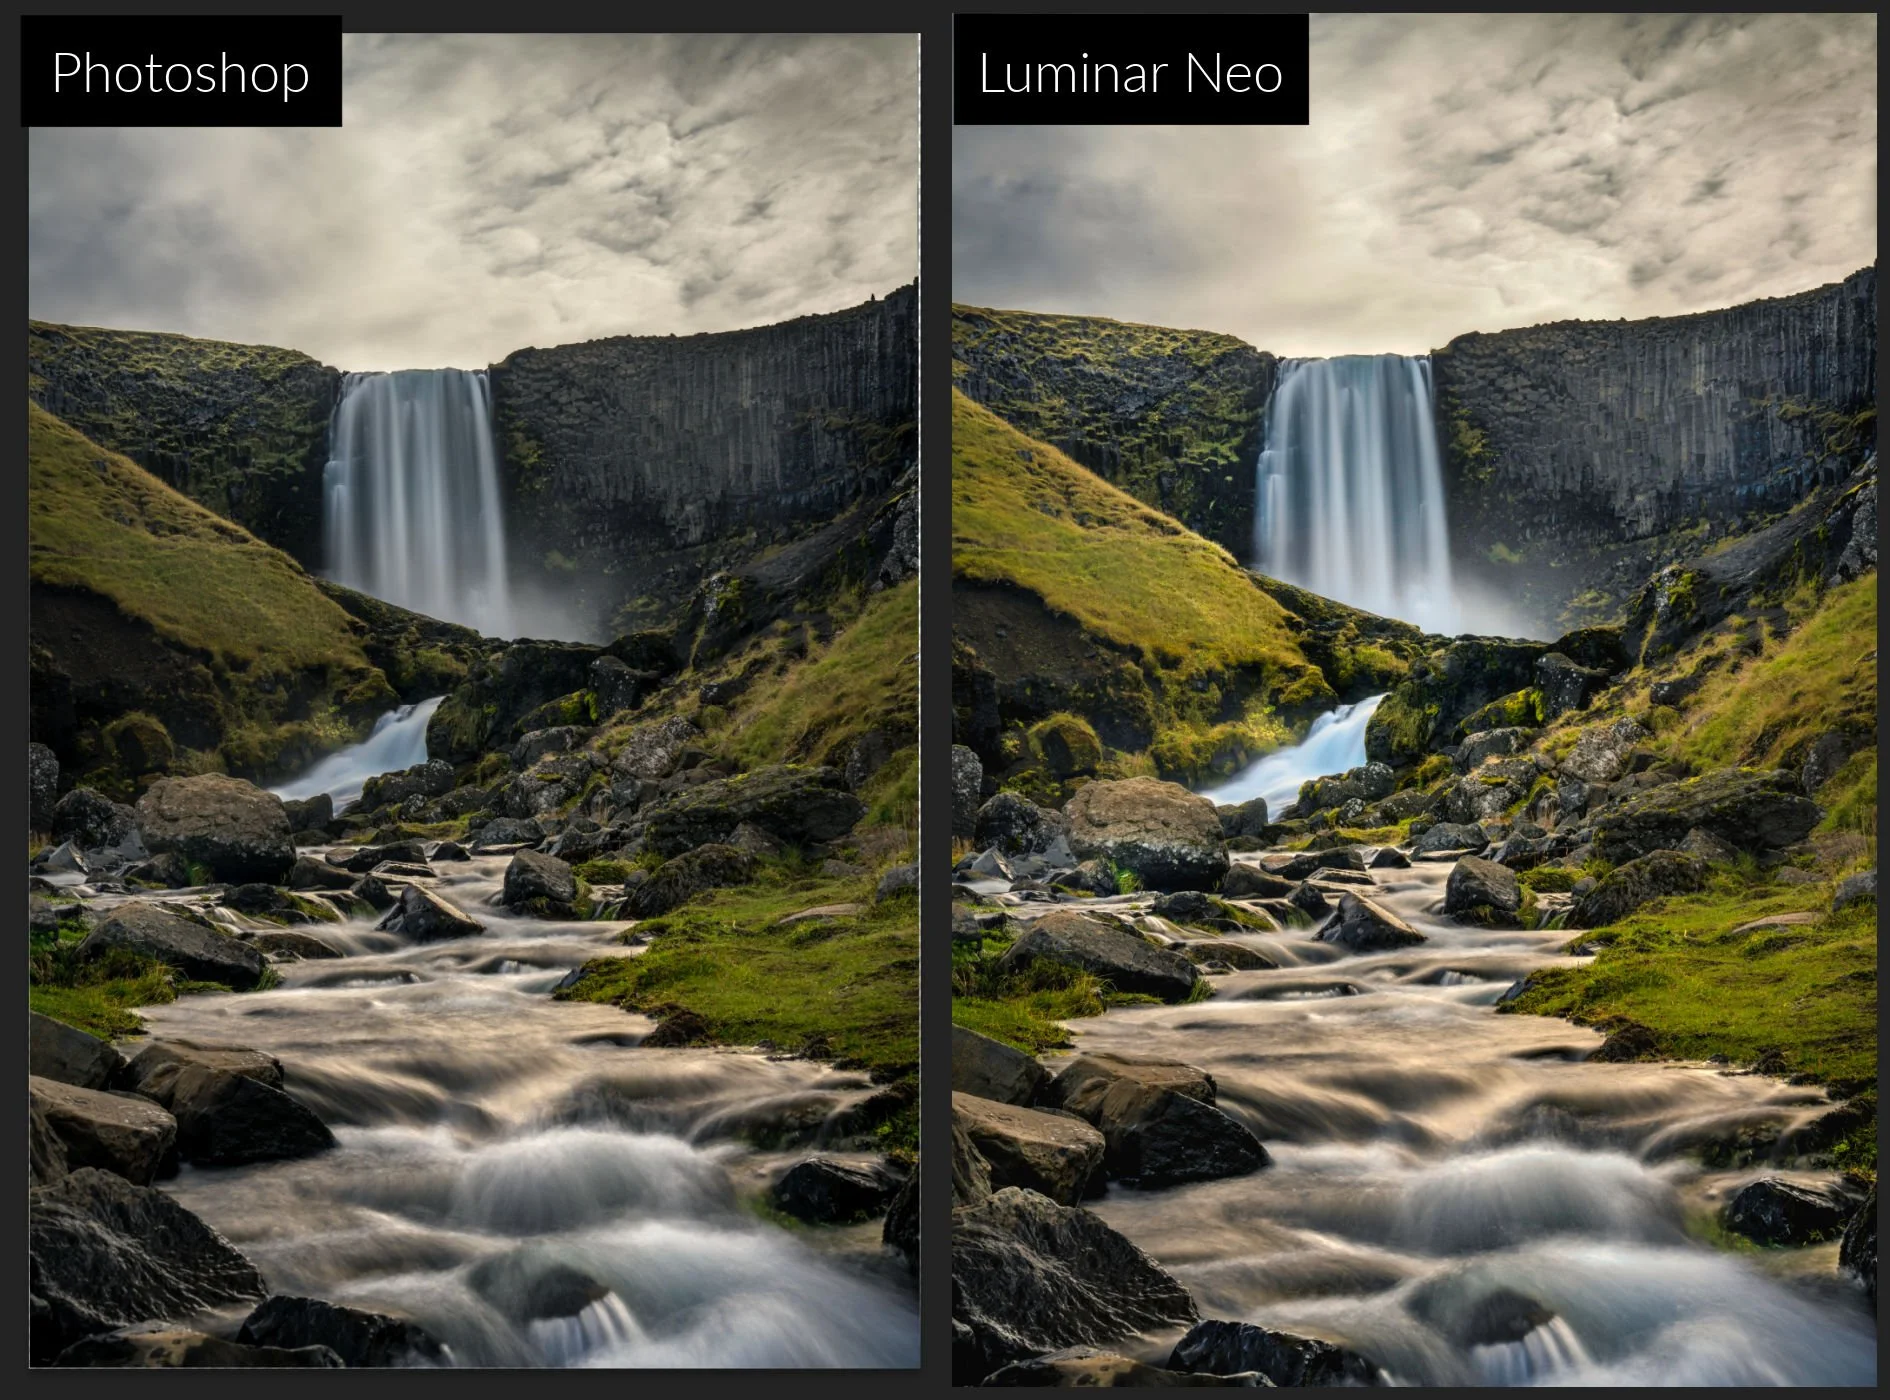
Note the edge pixels on the Photoshop focus stack are transparent and will need cropping vs Luminar Neo which retains the edges seamlessly
Simple vs complex focus stacks
Luminar Neo performs very well on simple focus stacks, for example:
Tripod-based landscape stacks
A small number of frames
Clear focus transitions
Minimal subject movement
In these cases, the results are clean, fast, and require very little user input.
However, with more complex stacks, the differences start to show. When I tested stacks created using my camera’s automatic focus bracketing function - which produces a much larger number of RAW files, Luminar Neo struggled with the distant background focus areas. The far-focus regions were not as sharp as Photoshop’s blend.
Interestingly, I found a reliable workaround: if I edit the files in Lightroom and export them as TIFFs, then stack those TIFFs in Luminar Neo, the distant focus problem disappears. This suggests Luminar Neo’s stacking performs better with pre-rendered files than with large sets of RAW files.
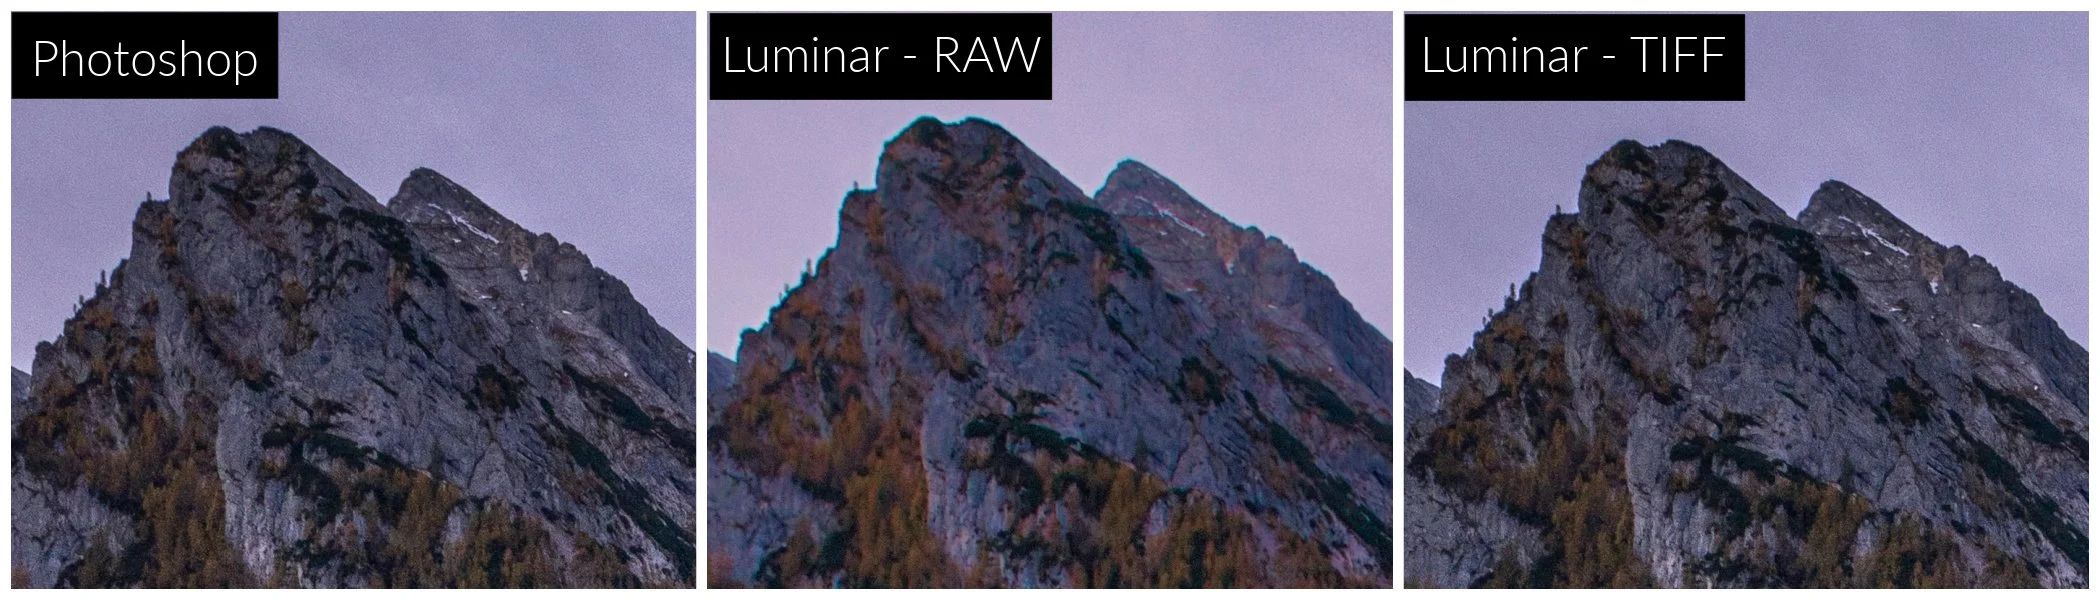
Photoshop shows the sharpest result using RAW Files, while Luminar Neo works if you export TIFFs for use in the focus stacking process.
Alignment: the BIG limitation in Luminar Neo
The biggest technical limitation in Luminar Neo’s Focus Stacking tool is that it does not handle large movement between frames in focus stacking.
In Photoshop, the workflow includes 3 steps:
Auto-Align Layers (which works even when the movement between frames is large)
Auto-Blend Layers
Mask-based blending
Because of this, Photoshop can successfully stack images that has significant movement between frames, including handheld focus stacks. I’ve processed handheld focus stacks successfully in Photoshop that Luminar Neo simply can’t handle.
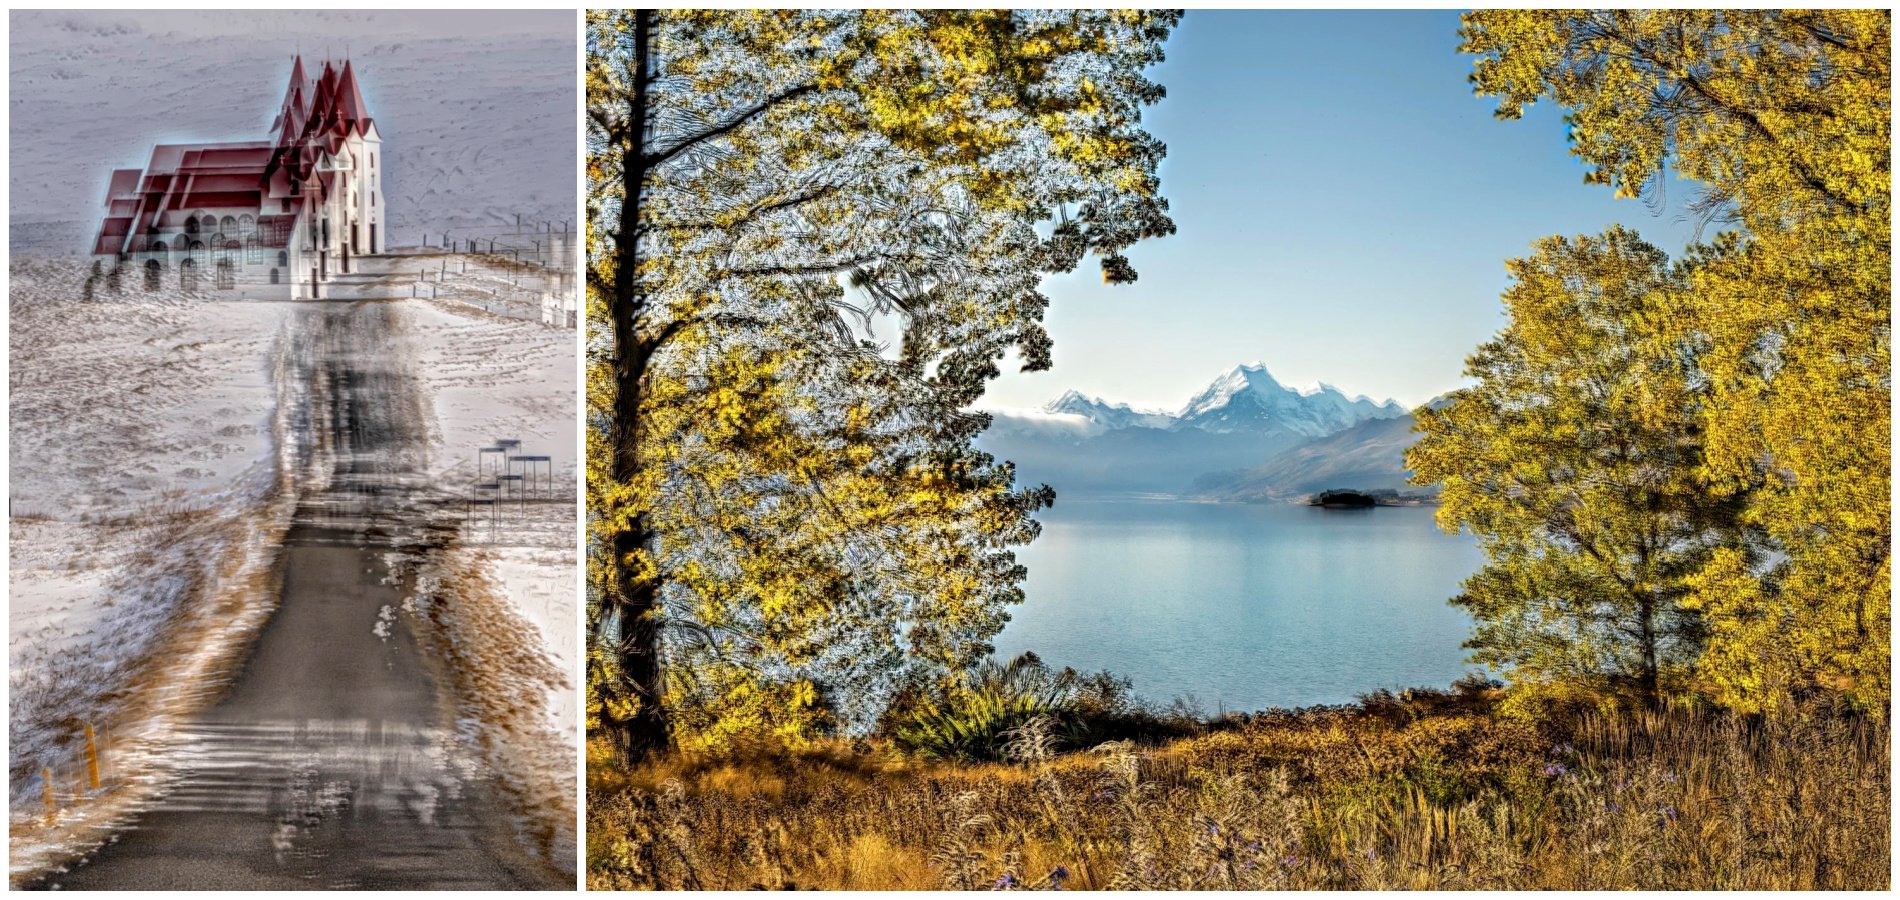
With both these hand-held focus stacks, Luminar Neo could not align the files correctly to produce a usable focus stack

The same hand-held images using the Photoshop focus stack process
That means Luminar Neo stacking is best suited to:
Solid tripod captures
Zero subject movement
Zero camera shift between frames
Anything outside that and you’ll have to resort to using Photoshop.
Mask control vs one-click simplicity
Another key difference is mask visibility and control.
Photoshop gives you full access to the layer masks created during blending. You can:
See which frame contributed to each area
Paint corrections with a brush
Fix blend errors locally
Manually refine transitions
Luminar Neo does not expose the masks. If a blend goes wrong in one area, it’s very hard to see where this is and you can’t selectively fix it.

Photoshop focus stacking provides full visibility over which parts of the image have been taken from individual files allowing for adjustments to be made where necessary.
Workflow Comparison
Best Luminar Neo Focus Stacking workflow
Edit one file from the focus stack in Lightroom
Sync adjustments across all stack frames
Export as TIFF or JPEG
Open in Luminar Neo
Run Focus Stack
Apply final colour and lighting tools in Luminar Neo
This works particularly well if you want to use Luminar Neo’s targeted lighting and colour enhancement tools as part of your editing process.
Best Lightroom + Photoshop Focus Stacking workflow
Edit one file from the focus stack in Lightroom
Sync adjustments across all stack frames
Select all → Edit In → Open as Layers in Photoshop
Auto-Align Layers
Auto-Blend Layers
Merge and save back to Lightroom as TIFF
Photoshop is more manual and slower, but more flexible and robust for all types of focus stacked scenes, but Luminar Neo will give you a quicker result, plus better finishing options for a pleasing edit.
Using Luminar Neo to focus stack this simple tripod scene gives access to a better range of finishing tools for the final edit.
Where each tool wins
Luminar Neo wins when:
You want quick, clean focus stacks
Your images are tripod-based with zero movement
You want to keep full frame edges
You prefer a simple, one-step process
You plan to finish with Luminar Neo lighting/colour tools
Limitations:
No auto-alignment
No mask access
Weaker results with large RAW bracket sets
NOT suitable for handheld stacks
Photoshop wins when:
You need maximum stacking accuracy
Frames include slight movement
You want mask-level control
You need to fix blend errors manually
You shoot complex or high-frame stacks
Limitations:
More steps
Slower workflow
Requires edge cropping after alignment
Final Verdict
Luminar Neo is excellent for simple, tripod-based focus stacks and delivers a fast, clean workflow - especially if you’re planning on using the fantastic editing enhancement tools on offer. But for complex stacks, handheld sequences, or critical detail blending, a Lightroom + Photoshop workflow remains the more reliable and flexible option.
🏆 WINNER: PHOTOSHOP 🏆 for overall focus stacking reliability
Curious to try Luminar Neo for yourself?
If you decide Luminar Neo is a good fit for your workflow, you can purchase it here:
Luminar Neo using code MEGHAN10 for 10% off pricing
This helps support my content at no extra cost to you, and I only recommend software I genuinely use and trust!
Want to read more in this series?
Why I added Luminar Neo to My Lightroom Workflow (And You Should Too!)
Using Luminar Neo for Light, Colour & Mood (Why These Tools Make Images Pop)
Sky Replacement Showdown: Photoshop vs Luminar Neo
HDR Merge Showdown: Lightroom vs Luminar Neo